Monday, December 3, 2012

Tutorial: How to Build a Skethar Alpha


This week's tutorial is for all you DGS Freeblades fans out there and those looking for insights into green stuff modeling.  Word has it from rules designer Jon C that a special mission is coming out involving a ton of Skethar demons and a few very bad ass Skethar "alphas."

For his latest commission Jon set me to task to building him one such demonic raiding party and I'm going to take you along as I take two Skethars and turn them into one alpha.

This tutorial is going to be broken into two distinct parts: basic and advanced.  The basic portion will involve no major resculpting to create the Skethar alpha, whereas the advanced section will give you a complete run down of how to really knock your conversion out of the park with a bit of green stuff.  I'll also be linking to the Gale Force 9 store page when a specific tool is referenced, you'll probably need to scroll down the linked page to find the exact tool in reference, but they're all there!

Ok, let's get started.


Here's the little devil who's going to be getting an upgrade to alpha status.  What really makes an alpha is a third pair of arms.  For our conversion we're going to do that, plus add a second tail.


On most Skethar sculpts there's a significant amount of flashing in between its left leg and tail, we're going to need to remove that.


A pair of trusty sprue cutters or wire cutters does the job.  Make your first cut parallel and flush to the tail, then a second cut likewise with the leg.  Bend the flashing up with your cutters/pliers and wiggle it to loosen it where it meets the thigh.  Twist the flashing with your pliers to loosen it further and then cut off any excess hanging on.  


It doesn't have to be the prettiest bit of cutting because we're going to take out an xacto knife and file the areas smooth where the flash connected to the thigh, leg, and tail. Pare your knife along the thigh taking off large chunks of excess like you're paring an apple.  With all but the smallest of leavings removed, take a concave file and file along the contour of the thigh, tail, and leg, smoothing off all excess pewter.


We're left with a nice clean area where the flashing used to be.


This is where the tutorial branches into advanced and basic techniques.  Where we're at, we want to add two extra arms and an extra tail, this can be achieved by simply cutting off two arms and a tail from a second Skethar model and gluing them to the one we are currently working on.  We'll get to that, but first the advanced route:

ADVANCED
Start by grabbing your bone saw (hobby saw) and cut the Skethar for conversion in half just above the hips.


ADVANCED

The idea is to put in a "riser," something to increase the alpha's height and give room to the new pair of arms and tail.

BASIC & ADVANCED

Here are the two Skethars being used: on the right is the one for conversion to alpha, on the left the donor of two arms and a tail.

BASIC & ADVANCED
To gather the needed arms cut the two top arms off the donor Skethar at the shoulder joint with a pair of hobby/sprue cutters.  Cut the tail likewise.  To complete the basic conversion simply glue the extra arms below the corresponding lowest pair of arms on the alpha conversion model.  Glue the second tail next to the first.  A bit of minor green stuffing may be needed to smooth the transitions between arms/tail and body, so I highly recommend that you continue reading on with the advanced tutorial to see examples of the arm/tail positioning and the green stuff transitions.

ADVANCED continues to tutorial's end
We're going to take advantage of the space created by the riser to make room for the new arms, so let's lay him out and get an idea of how much space we need.


About 1cm looks good.


The foundation for our riser is going to be a metal pin with a green stuff abdomen sculpted over, so the next thing we need to do is drill a pilot hole in both ends of the Skethar with our pinning vice.


I'm using a drill bit that fits a paper clip (.85mm I think..), which is super handy because clips are a dime a dozen.


The new tail goes right next to the old one.  I bent both in novel ways to add a bit of variety as well.

ADVANCED & BASIC tail and arm positioning

The extra set of arms is best placed snugly under the armpits of the lowest set of original arms.


We can get all of that done without the use of green stuff, but now we need to break out our sculpting tools to build the alpha's abdomen and create transitions between his new arms and his body.

Let's take a look at some helpful tools.


I just picked up these Colour Shapers today, and man, they are sweet.  What they are exactly, is a set of rubber tipped smoothing and edging tools, excellent for finishing details.  I bought mine at Creative-Coldsnow in Overland Park, KS and the company that makes them is Royal Sovereign Ltd.  Each tool comes in an option of sizes, firmness (ranging from soft to firm to extra firm), and shape.  For my uses I picked out an extra firm 0 flat chisel, a firm 0 chisel, and a firm 0 cup round.


The Colour Shapers are great for finishing and crisping detail, but the real bread-and-butter work is done with a selection of GF9 metal sculpting tools.  My favorites are the narrow spade/wide spade tool and the curved knife/flat round tool.


The narrow spade is excellent for applying green stuff, smoothing it to the model and building the shape you want your sculpt to take.  The curved knife is great when pressing into narrow cracks and making sharp lines.


The wide spade excels when you need to flatten a piece and the flat round is likewise, but when you need to get into a nook or cranny that the WS won't fit.


To begin  sculpting, I mixed up some green stuff and pulled off a blob that would wrap completely around the model, flush with both the torso above and the hips below.  Don't worry so much about clean lines now, we'll take care of that in a bit.


Next, I applied a bit of 'stuff to give some ribs to the alpha and bulk out its tall core.  This is a great time to get in there with your rubber tipped tools and create ab lines and rib contours.  Gently draw the tool (I suggest using the angle chisel) across the 'stuff deepening the grooves you're making with each pass until they begin to take shape.  The cupped chisel is great for rounding out the edges you've created ensuring they don't look boxy and contrived.


On the back I'm placing little balls of 'stuff and then smoothing them into their surroundings to create more spines.  While I'm working I'm also creating transitions between the new arms and body.  Notice how the left lower arm's transition is a bit bulkier than the right?  That's because the muscles there would be contracted and flexed to have the arm back in withdrawn position.  Use your own arm/shoulder for reference!


The main thing when working with new sculpting tools and green stuff is to experiment.  Take the instructions here as a general guide and see what works for you.  Play with the green stuff at different stages of setting (drying) to see how it reacts to you manipulating it with tools.  Sculpting is a learning process, don't be afraid to mess up to come back later with an xacto to cut off what you did and start over.


That's it, an alpha to lead the pack.  I hope you found this tutorial to be both helpful insightful and takes your hobby to the next level!

Come back again next week to see what else we're creating at the Monster Lab!


Monday, November 26, 2012

Soul Grinder Models Complete

The soul grinder conversions I was working on two weeks ago are done!  Let's take a look..


The headdress was an important part of The Wizard's conversion, acting as both focal point and major contributor to his theme as a disciple of Tzeentch.  It turned out better than I hoped, very Tzeentchy and very arcane.  The asymmetry of the crest design gives a nod to chaos, but is clean enough to befit a high minion of the god of sorcery.


The flames coming off The Wizard's claw were the last addition made to his model.  Stepping back from him I knew he needed some more items that said, "I'm a disciple of the arcane."  


Unlike his counterpart Crabby, The Wizard has multiple pieces of ornamentation, in this case a bit of bling around his neck.  All hail the Lord of Change!


And here's Crabby in all his chaotic glory.  What says chaos more than extra eyes and mouths?


... a face a mother wouldn't even kiss.


Crabby's gaping mouth was part of an early attempt to create differentiation between the two 'grinders I was working on.  I was digging its hideously unfinished nastiness, but felt he still needed a little something.  In the end it was a pair of mandibles that won out, it still keeps his mouth unfinished and nasty, but properly functional.


With the 'grinders done it's back to working on commission pieces for me.  On my desk are a slew of Skethar demons from Freeblades, a Warp Wolf/Ghetorix conversion for Hordes, and a very special commission due in February!  I was contacted by a local convention to do an original sculpt for their convention miniature.  This is especially exciting because it will be my first massed produced mini!

Thanks for dropping by the Monster Lab, come back next week to see what's on my desk and for more hobby goodness!


Monday, November 19, 2012

Showcase: Arsmouth Freeband

Another commission is in the books and I have a new batch of Freeblades minis to show off!  Here they are!


This muster archer is painted wearing a menagerie of peasant greens, browns, and greys, having either spontaneously joined the freeband to protect his farm or because a heavy handed magistrate ordered his conscription.


All musters have an armband with the county colors they are privateering for, in this case the sky blue of Arsmouth.

A custom arrow, made from Formula P3 super thin .5mm brass pin and thin-sheet plasticard completes the muster's bow and arrow ensemble.


A more formally equipped member of the freeband is the militiaman, who shares uniform tabard, tunic, coif, shield, and bracers with his fellows.


To date, I've done three Arsmouth militia spearmen for Jon, so this time I wanted to add some visual variety to the group by posing this one in a crouched stance.  


Check out his left eye, it's been lamed when he suffered a slash down his face where he still has the scar to prove it!


I've begun transitioning to a non-metallic metal schemes on most pieces, in this commission the only metallic areas were the chain mail coifs on the the spearmen.


A couple of months ago I received a very special commission that included two unreleased models for the freeblades system.  It was a incredibly cool experience being the first anywhere to put paint to a brand new model and I feel especially honored to have had the opportunity.  Well, one of those models became my absolute favorite from the range and this apprentice knight of Vidnuar is directly inspired by it.  I'm looking forward to posting pics of those two yet to be released models when they are ready to make their debut!


This apprentice knight really keys off on my efforts to transition to NNM painting styles.  Not one drop of metallic paint was used him and in the end it really lends to a clean look with crisp lines.  


This model is a variant on the apprentice knight of Barek with the only difference being his greatsword and lack of goatee, so I was set to task adding differentiation between the two.  The skull between the knight's feet was removed and his trailing leg was bent back to give him a striding pose and increase his dynamism a bit.  The addition of a ponytail and fluttering ribbon are both nudges pushing him towards the pretty-boy look of those who follow Vidnuar the lion/leadership aspect.


I'm glad Jon appreciated the subtle touches that were the graying hair and lamb's wool vest on this muster thresher.  He may be old, but not so old he won't bludgeon you with his flail!


I had a lot of fun painting up this Vekul, and took the opportunity to do a snow basing for the first time.  I used GW's snow effects, and was reasonably satisfied... until the basing completely dried.  Admittedly I was using their old snow product (I'm unsure if it has changed since it received new packaging), but the use of long "string" pieces as snowflakes instead of powder is not what I'm looking for.  Think "a giant woolly beast just shed" instead of "yay, it just snowed!" and you'll get the picture.  For future projects I might try Snow Tex, but am undecided, any suggestions?


Thanks for stopping by the Lab and checking out my latest work, come by next week to see the completed chaos soul Grinder models I started on last week and later on down the road a Ghetorix/Warp Wolf conversion for Hordes!

Happy hobbying!

Monday, November 12, 2012

What's on My Desk: Chaos Soul Grinders

I'm a big fan of the chaos demon soul grinder kit.  The unit itself is incredibly cool and lends itself to a whole world of conversion opportunities.  At the time of its release in 2010, the 'grinder was one of the first in many new plastics that represented high quality product that pushed visually what chaos armies would look like on the table top.

It was innovative in 2010...


Sadly, unlike some of the newer plastic kits, the out-of-the-box potential for variation among 'grinders was limited to a right arm swap...


Such a waste...


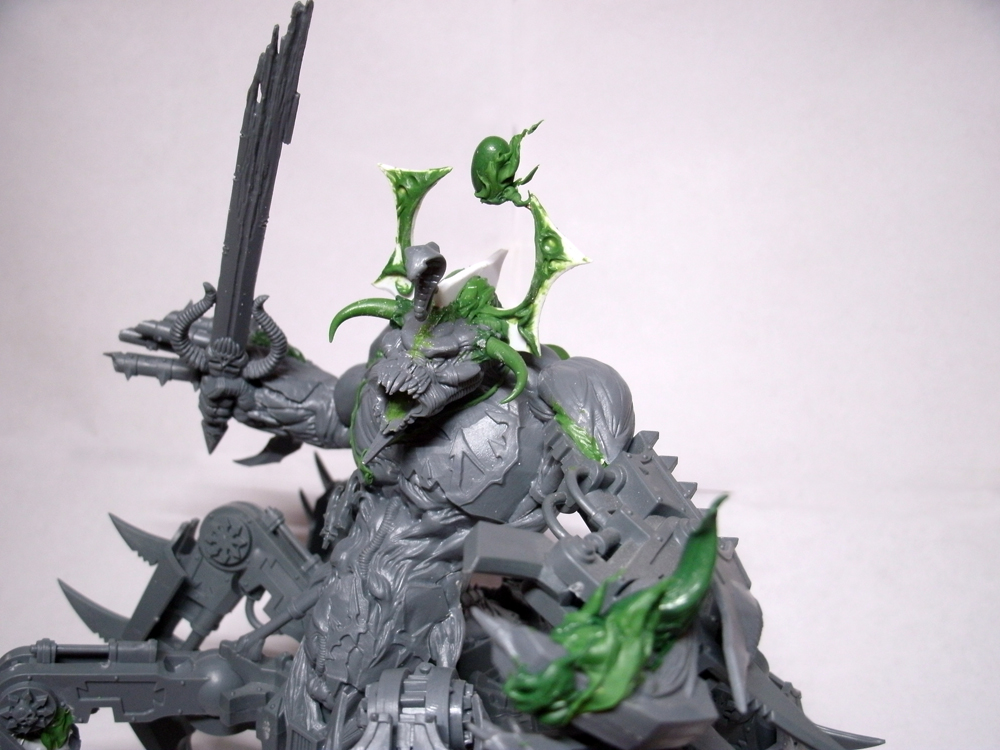
That's why this week I have a couple of soul grinders on my desk and am busting out the green stuff, xacto blade, and modeling tools to do some custom 'grinder conversions!  Let's take a look at the progress so far.


I wanted my two soul grinders to have their own distinct flavors without having to do a lot of drastic body work.  I decided to do this in two ways: 1. weapon swaps and variation and 2. an individualized character for each model (I'll explain more in a bit). 

First up was to create variation in their weapon kit-outs.  Since I had two kits, and each came with a sword and pincer claw, I took the extra pincer claw and swapped it for the stock mech-claw on the first grinder's left arm (we'll call this one Crabby).  Right away this gave Crabby a more aggressive look than his counterpart, so I ran with the theme of making him look as menacing as possible.  In chaos terms this means an extra mouth here, a ton of extra eyes and buboes there, spikes, and a face a mother wouldn't even want to kiss. 


The eyes/buboes were really easy to make, I simply rolled out a number of green stuff balls, waited for them to dry overnight, then cut them in half and glued them on.  I still need to finish the eyes on his torso with eyelids (the buboes on his plates won't need any finishing work).


All the spikes are ringed with a roll of green stuff, pressed to give the impression that they bust violently out of his skin.  The ones on his back still need a bit of finishing work.

I'm pretty happy with how Crabby is coming along, but am undecided on how to finish his mouth.  I'm stuck between leaving it the way it is (disgustingly unfinished) or adding rows of tiny sharp teeth (classic nasty).


The second grinder is having far cleaner approach taken towards his conversion, less spiky/mutated and more contrived/arcane.  

Instead of adding spikes, eyes, and extra mouths, this 'grinder (dubbed "The Wizard") got additions that would appear less spontaneous, like a headdress, necklace, and sword.


The headdress is made from two pieces of plasticard, cut and filed.  A cobra from the Empire wizard plastic kit (probably my all-time favorite GW kit) was added to give that Egyptian look that is so indicative of all things Tzeentch.  Another detail that sets the headdress apart and cements The Wizard's magical prowess is the floating flaming orb set within it.  The orb was directly inspired by my favorite Magic: the Gathering character (I know, a lot of favorites in this post!) Nicol Bolas.  The very nature of an object floating presents some interesting obstacles.  For starters, it needs to look like it is suspended without support.  To do this I positioned the orb with a super thin .50mm pinning rod and sculpted fire onto the orb itself.  Besides looking cool (what's cooler than a floating orb that's spontaneously immolated?) the fire will partially cover the rod and give the orb a strong feel of independent suspension.


Since Crabby had a lot of spikes bulking up his shoulders and back, I wanted to give The Wizard a slimmer shoulder line.  To do this I cut off the smoke stacks on his back and positioned them on his right arm harvester cannon. The stacks ended up being the perfect size to act as two additional barrels for the cannon, so the goal was achieved and no parts were wasted!


A bit more green stuff work and Crabby and The Wizard will be done and ready for the painting table.  Come back next time to see the finished conversions!

Monday, November 5, 2012

Showcase: Kairos Fateweaver

This week a model very special to me is finally receiving the hobby showcase he deserves, Kairos Fateweaver!


Kairos is standing on a custom sculpted warp base I made to fit into a display board for my 40k demon army.  He's very blue and the base is very red, so to ease the transition between model and base I painted purple/blue swirls emanating from his feet... his latent magical power bleeding off if you will.

The fiction behind Kairos says that one of his heads sees only the future and the other only sees the past.  The sculpt gave a strong sense of which of the two each head was, so I furthered that by painting the taller and more energetic one to be more vibrant.  From the war-like cap he's wearing to his colorful beak and glowing eyes, everything about the head points to him being virile.  The lower head on the other hand has a bleached and weathered beak and his dim eyes are almost completely inky black.  A start contrast to its counterpart. 


I took inspiration for the look of the writing inside Kairos's tome from the Lord of the Rings elvish script, very long and angular.  The nasty chaos energy contained within his grimoire is so potent it's literally burning its way out!

There's tons of details on the model that have little bits of significance, like the fish on top of Kairos's book.  When I was running a campaign my buddy Dave insisted that I paint it white.  He was playing Blood Angels and he wanted Kairos to be the nemesis of his librarian, "he'll be like my Moby Dick," he said, "my librarian's white whale."  And that's how the fish became an albino!


Kairos's cloth pieces have star fields glittering across them, among which are red, blue, yellow and white stars.


His wings, which don't look like a prominent piece, were one of the most time intensive parts of the model.  Each feather ridge has been painted individually with three highlights!

It's a huge relief to finally have Kairos done as he is the centerpiece and general of my Tzeentchian demon force and a main factor in every game he is a part of.  With one squad of horrors done and now Kairos himself, there's plenty more to do!


Related Posts Plugin for WordPress, Blogger...