Showing posts with label 40k. Show all posts

Monday, January 14, 2013

What's on My Desk: Grey Knight Terminators


I'm back to work this week and have a squad of Grey Knight terminators and Lord Driago on my desk.

This is a commission piece at the showcase level of painting (level 2) and I wanted to do some great scenic bases to match.  Ruined cityscape is always a good basing choice for the armies of the 41st millennium and even more so for the Grey Knights.  Whether they are coming in as a MIB style clean-up crew to purge the heretic and alien or be they battling across a ravaged city-hive fighting to the heart of a demonic invasion, city bases look great and give that extra umph to Grey Knight models.

Let's take a look at some of the bases and break-down how they were made.


Each basing was built on a foundation of Apoxie Sculpt, a great modeling apoxie ideal for large projects that need a lot of coverage.  Apoxie Sculpt is also much easier to spread and shape than green stuff and can be easily carved after curing.  I purchased the white apoxie kit, although tons of colors are available from Aves.

I began by mixing a portion of the two part Apoxie and applied it to the center of the base in a clump.  With a broad modeling tool I smoothed it across the remainder of the base and then pressed broken pieces of the cities of death boxed set floor tiles (I don't think they make it anymore..) and rocks into it.  I also bent and then pinned brass rods into the sides of the tile piece to look like broken rebar. The whole thing is finished by brushing on white glue (Elmer's) and then applying Woodland Scenics fine and medium ballast to bring together the rocky debris.


For this piece I cut a section from a Plastruct I-beam and set it into the Apoxie Sculpt.


When I was building the bases I tried to keep the figures I had built in mind, but for the most part, I made bases that I thought would look cool and then matched the Grey Knight who would look best on a base to that one.  There's just something that's super cool about this guy, he looks like a G.K. ninja about to lay the smack down!


Plastruct cylindrical tubing makes ideal pipes.  The base at the rear of this group has an assortment of small, medium and large tubes jutting out from the ruined tile above it.  The tile also has fractured pieces hanging off its side, supported by the rebar between them.


Another of my favorites, this G.K. has a strong sense of forward motion. I wanted to place him on a base that paired well with his posing and ended up on this one.  He's coming down from a higher vantage point on the base looking almost like he's jumping, but definitely about to bring the Emperor's justice to some heretic/alien scum/demonic menace.


I don't get to do space marines often, and I have to say, the work so far on this commission has been refreshing.  I'm looking forward to getting some paint on these guys and think I might try my hand at a non-metallic metal scheme instead of the classic blue-silver.  I really want these guys to shine on the table top and have been pretty happy with the pale armor I've done on a past commission.

Thanks for stopping by and checking out what's on my desk!  Come back next week to see what other projects I'm working on here at the Monster Lab!

Monday, November 26, 2012

Soul Grinder Models Complete

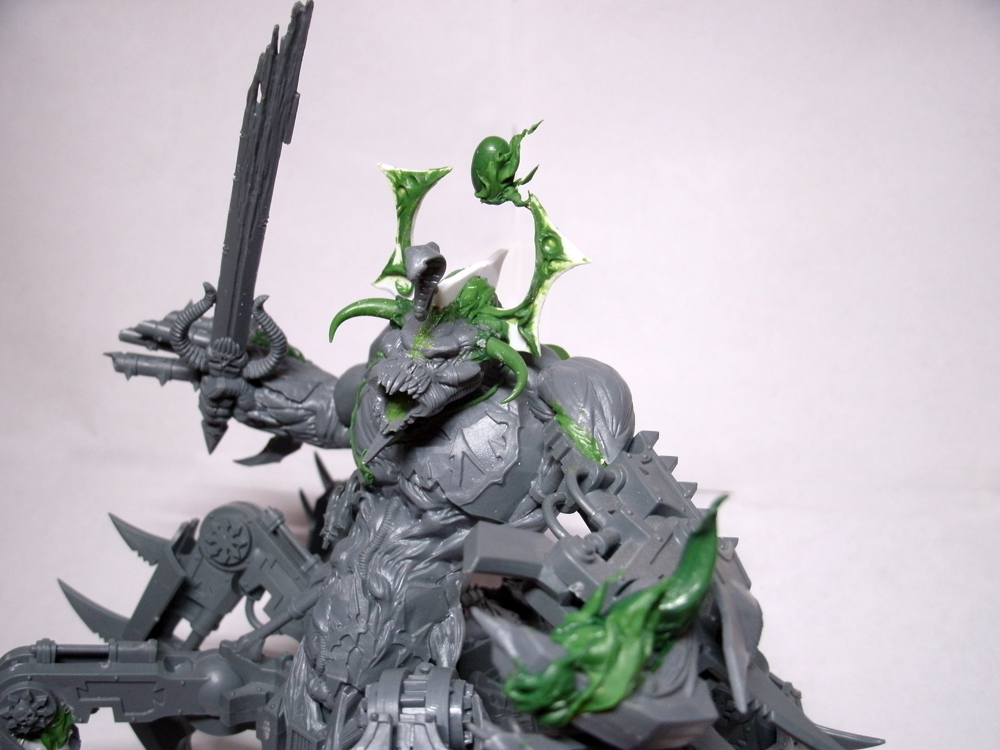
The soul grinder conversions I was working on two weeks ago are done!  Let's take a look..


The headdress was an important part of The Wizard's conversion, acting as both focal point and major contributor to his theme as a disciple of Tzeentch.  It turned out better than I hoped, very Tzeentchy and very arcane.  The asymmetry of the crest design gives a nod to chaos, but is clean enough to befit a high minion of the god of sorcery.


The flames coming off The Wizard's claw were the last addition made to his model.  Stepping back from him I knew he needed some more items that said, "I'm a disciple of the arcane."  


Unlike his counterpart Crabby, The Wizard has multiple pieces of ornamentation, in this case a bit of bling around his neck.  All hail the Lord of Change!


And here's Crabby in all his chaotic glory.  What says chaos more than extra eyes and mouths?


... a face a mother wouldn't even kiss.


Crabby's gaping mouth was part of an early attempt to create differentiation between the two 'grinders I was working on.  I was digging its hideously unfinished nastiness, but felt he still needed a little something.  In the end it was a pair of mandibles that won out, it still keeps his mouth unfinished and nasty, but properly functional.


With the 'grinders done it's back to working on commission pieces for me.  On my desk are a slew of Skethar demons from Freeblades, a Warp Wolf/Ghetorix conversion for Hordes, and a very special commission due in February!  I was contacted by a local convention to do an original sculpt for their convention miniature.  This is especially exciting because it will be my first massed produced mini!

Thanks for dropping by the Monster Lab, come back next week to see what's on my desk and for more hobby goodness!


Sunday, April 22, 2012

Pre-heresy conversion Pt. 2


All right! After a long week it's time for the second installment of the conversion! Leaving off from where we were last, we need to clean all of the warp filth from the legs, arms, shoulders and weapons.


Now is also the right time to gather basing material. For these conversion troops I'm using an urban theme. Here is a look at the stuff below-

These are all pieces of plaster molds of urban building rubble and random crap, but all good for the look I'll be shooting for. Also the fact that most of this stuff is made of terrain plaster, it's easy to break up. Now keep in mind that my experience in this sort of basing is limited to Flames of war 15 mm stuff, but it's all the same in theory, so we'll see how I do.

Now comes the real "work" if you will. I have spent a good bit of time researching this project by looking up artists renditions of the different legions usually found on the book covers of the Heresy series, other hobbyists work random depictions and so on. What you generally find is that no one is truly "accurate" when it comes to the Mk patterns of the pre-heresy armor. You will see all kinds of goofy stuff in pictures, for instance a beaky appears on the back side of the cover of Prospero Burns. Mk VI in pre-heresy... I don't think so, but ultimately this works in the hobbyists favor in that we have artistic license as long as we try to keep the "flavor" of the Pre-heresy. My shoulder pads will be the biggest offender here, but, The ones I'm using will allow for an easier heraldry application. And quite frankly, if you find people are criticizing your  interpretation, tell them to go drink a bolter round.

Now I begin to gather together the pieces I initially want for each marine. below is an example of what I may end up using for the Night Lords.
As I work along I try to imagine what the Marine is doing in combat to find the right limbs and weapon combos, This step for me changes constantly, so I like to use thumb tack or poster tack to get an idea of what I'm working to, like pictured below.
This just gives me the rough draft opportunity, to see what poses i can play with. Take close look at the marine in the center, with the chain sword, he is going to change! I don't like how he is turning out, and I want something more "Epic" if you will. It was at this point that I decided that he would be my Luna Wolf. Can I get a "Luprical!" up in dis house? Any way the first step to creating an "Iconic" figure was to go after another modification to the helm. Something that would really stand out. A horsehair crest. And here's how I did it:
With Green stuff made a thin brick about 5/8ths of an inch long by 1/8ths tall. Then I stuck it onto the very end of my plain 'ol exacto knife to form the horse shoe shape. Turns out that this is the perfect arc for the size of the helmets. I used a flat sculpting tool to flatten all sides while still adhered to the end of the knife. I let it dry for about 12 hours, popped it off the knife and scored it for texture.

Next I requisitioned a frag grenade from a trooper and cut a piece at the first notch. This will become the crest "hilt".
Now I have glued the "hilt" to the top of the helmet.
And BAM! We have an Iconic helmet! now I'm getting excited! Next I start on bases, You can see below that I slapped together a 4 piece base using elmer's glue for the large pieces. Two pieces are below to give the base some height and at the same time tilting a slab. 
For the rubble I use kitty litter. What I do is take "unused" kitty litter and put it in a sandwich baggie. I then use a spoon to crush it down to "scale". I'll then separate half of the crushed litter to an opposite corner of the bag and crush that down again. then you just shake the two sizes back together giving you a very nice size variation. now I add Elmers glue again to all of the spaces and crack where I want rubble. I then just dip the base down into the baggie and there you have it, instant urban rubble. Let that stand and dry for an hour and then wash over the base with a 50/50 mix of elmer's and water to seal the base. Now to add our legs!

After the base has dried, I super glue the legs on, looking for the best possible pose.
This is a behind shot of the same base. And below you can see that I have legged all my bases.
If you look closely you will see that I do have some plastic scraps on the bases as well. What I do is use a lighter to heat them up and deform them on a table edge to make them look like broken and melted beams. plasicard I-beams work well for this, I just didn't have any at the time, so i improvised. I also replace torsos with thumb tack to further work out poses. Now remember that Luna Wolf from earlier? Below is a reminder...
Here he makes another pre-pose appearance along with a yet to be named on the left and The Night Lords legs on the right.
Here is the mighty Astartes again, but I just don't want those arms, so I'm going to swap arms for a truly awesome pose! In the mean time we need to take a quick look at modifying backpacks.
This is really easy. Cut off nozzles. cut away Extra "taint" , Glue nozzlesback on. pretty cut and dry. The right is before, the left after. Here's another type-
You may want to use a little green stuff, but not too shabby on its own!. So now with some backpacks ready and the Arms I want,  I assemble The Luna Wolf.
Charging into battle This company Captain will be know to me as Garviel Loken.

                                                   NAME THE BOOK COVER!


Thank you all for reading! Any questions, Feel free to ask. Part 3 coming soon! In it we will look at little mods to make each Legion represented look unique before we move to the painting !

The Emperor Protects!
-JOHN

Sunday, October 30, 2011

Building a Display Board Part 2: Scenery & Details

This week we're picking up where we left off in constructing a display board. Last time, as you may well remember, we built up the board's foundation with two simple materials: composite board, and insulation board with the use of a hand-saw, a box cutter, and some all-purpose glue.

As we continue this week, here's the tools/materials we'll need:
3. Box cutter
4. Shop vac
5. Fine grain sandpaper
5. Felt tipped marker
6. Small caliber x-acto blade
7. Plaster, I use Woodland Scenic's Mold-A-Scene Plaster, it incorporates a light weight ballast which gives the texture an integrated rocky appearance


Now that the foundation's glue seal has set for a least 24 hours we're ready to continue with the construction of the board and get started on the fun part, building terrain.

In order to create organic transitions between the layers on our board, we first need to ready the layers by trimming their edges. To do this, run your box cutter at an oblique angle to the corner, making sure that your cut pierces the foam on the lower side. What this does is remove the sharp corner on the higher layer, readying it to be smoothed to meet the layer below it.

This is what the top layer's edge should look like after the corner has been removed.


Now that there is a smoother surface, we'll continue the transition by brushing the edge with our steel brush. Apply enough pressure to shave off the foam while brushing, but don't apply too much pressure that you start creating deep grooves. After you have brushed in one direction, turn your brush and come at it from another direction. My method is to brush down the slope I wish to create, and then turn my brush perpendicular to my previous strokes and brush the face of the slope. This will ensure that unnatural grooves don't form from brushing in only one direction and a clean slope forms.

Use your shop vac to suck up the foam debris often, this technique creates a mess!


Make the slope gradual, this will keep your models from having to struggle to keep from falling over.

To finish the slope-transitions, sand the slope with your fine grain sandpaper.


For the lowest of the three levels I'm choosing to have an abrupt transition and will keep the straight up and down edge. This will effect the appearance of a retaining wall.

Related Posts Plugin for WordPress, Blogger...