Tuesday, October 29, 2013

Elder Horrors for the Warhammer Universe

There's the faintest foul hint on the fell north wind.  A thrum, a pulse, the suggestion of alien voices chanting in unison.  The strangeness of the sound is abhorrent, but in it lies a truth begetting something more.  A piece of primal suggestion tugs at the soul recalling bygone eras of immemorial past.  It is the ancestral memory of an elder horror which stalked the world before man raised his first monument, and now it seeks to return!

Yes, I have been reading a lot of Lovecraft lately.  The Shadow Out of Time, Mountains of Madness, and of course Call of Cthulu.  I've really enjoyed stepping into Lovecraft's universe, where a daring scientific expedition or even a simple backwoods can be the setting for mystery, suspense, and horror.  It just so happened that a returning customer, Michael P., wanted a commission that fit perfectly with the great stories I've been reading.  With inspiration readily on hand, I set to work crafting a pair of horrors that would make Lovecraft proud.

Let's take a look!


The job was to convert two demon princes for Michael's fimir themed warriors of chaos army.  The basis for the conversions came from the Dark Lands collection with a few bitz from Warhammer and Warhammer 40k thrown in.


A lot of the work was original sculpt conversions done with Procreate (grey stuff) and green stuff modeling epoxy.  Procreate works really well for details that you want to hold a crisp edge, like this Cthulu prince's face tentacles.  Procreate also performs better than green stuff under an xacto blade or file for when you need to fine tune details or make adjustments.


To build the Cthulu theme on this piece I sculpted barnacles clinging to his shoulders, back, and appendages, and made ribbons of seaweed dangling from his horns and loin cloth.


Michael wanted a scythe hand for this model, so a bit of green stuff and a tyranid scything talon later.. and Cthulu prince was packing some serious stabby action.


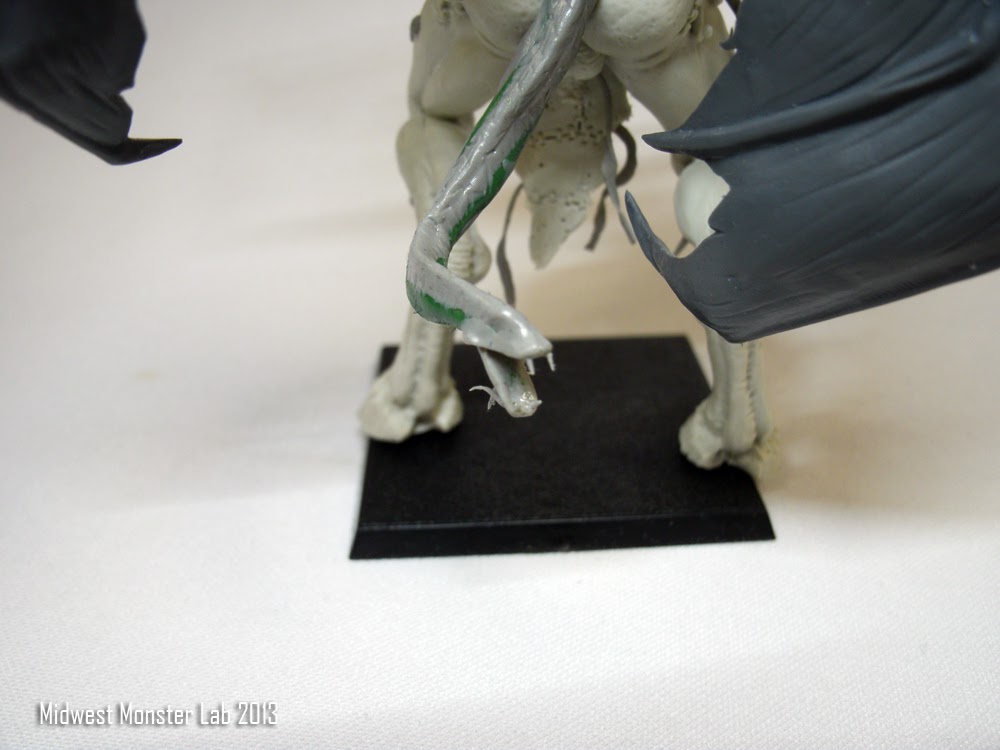
I had the idea to make the tail have a mouth and teeth (chaos tip #1: add extra mouths, eyes, and teeth to increasy chaosy-ness).  After some thinking I came up with the notion to make it a blind snake as serpents are classic nautical beasts.


The demon prince plastic kit's wings fit excellently with the sculpt and scale of this piece.


The whole thing came together quite well, as it gets the theme across but doesn't ride the Cthulu-idea too hard.  I'm excited for Michael to add this to his force!


I did say that there was another prince in this commission, one that is certainly no less horrific than the last!


The theme of this one was definitely "eyeballs."  Which once again comes back to chaos tip #1 in stunning fashion.


I've done a stomach mouth before on a soul grinder project and was looking forward to take number two on the design.  For this one, the direction was stubby "frog" teeth (I know, frogs don't have teeth, but the descriptor strangely works).  I wanted a series of eyes low-set over the mouth to give a strong facial impression and a long forked tongue to drive home the amphibious nature of this grisly mutation.


Eyeballs are everywhere on this model, mounted on two shoulder tentacles, on its tail, on its fingertips, head, shoulders...


Technically this prince is a biclops, or two-eyed cyclops.  Yes, there is a difference, he has two eyes, but one is aligned over the other!


This giant got converted three-toed "fimir" feet as he is a mutated fimir champion.


And in case a slew of extra eyes wasn't enough, this prince has four more on the tips of his fingers; probably for use as a strange hand parascope or looking into finger-sized cracks.  Come to think of it, that would be quite handy, though you would have to be careful not to stub your eyes!


That's all the horrific and eldritch terror I have to unveil this week.  I'll be back next week with a look at some X-Wing minis that received new paint jobs!

Until then, good gaming and happy hobbying!

Tuesday, October 22, 2013

Showcase: Sorcerer of Tzeentch

I'm wrapping up a conversion project this week and it's not quite ready for pictures just yet.  I'm excited to show you the completed project using Darklands Miniatures next week!  Until then, let's take a look at a quick 3.5 hour paint I did a couple of weeks ago for a new customer David D.


David wanted the codex paint scheme for the sorcerer and I was happy to oblige.  The combination of regal blue and gold are fantastic.


I used Valejo's Old Gold, which has a rich dark color, for all the gold pieces on the model.  Old Gold is one of my favorite paints and is perfect for the time worn and chaos weathered armor of the Thousand Sons.


The sorcerer's sword blade was a major contrast point and I had fun digging out a color scheme from a previous commission to do his.  The sorcerer's and the backpack's eyes were another minor contrast point, simply done with Goblin Green and Scorpion Green.


After a few hours I had a model I liked and was proud to hand over to David.  Both the Abaddon he commissioned previously and this sorcerer have been rampaging across our local game store's table tops claiming glory for chaos!


Thanks for stopping by this week to see what's going on at the Lab, come back next time and check out two unique demon prince conversions for a fimir themed fantasy army!

Monday, October 14, 2013

What's on My Desk: Dragon Chariot Base!

I've got an exciting project on my desk this week, a custom sculpted dragon base!  The client who commissioned this piece requested a 50mm x 100mm chariot base that featured a dragon's nest with a few eggs and one with an emerging hatchling.   I loved the idea; I've been a dragon fanatic ever since I can remember and jumped at the opportunity to make my first themed piece.


To get started, I needed to make the base's foundation.  To do this I cut three pieces of 1mm plasticard to dimensions and lightly glued them with super glue.  Two brass pinning rods also added some stability to the plasticard sandwhich before a rough sanding on the sides created the edge gradation.


A layer of Apoxie Sculpt gave the foundation some natural terrain variation, and Procreate rocks began to build the scene.  Larry the skeleton also did a great job providing scale reference.  Thanks Larry!


What I envisioned was the dragon-mother digging out a bowl for her eggs, and breathing dragon-fire out from her nest to clear the surroundings.  Each of the rocks has been sculpted to be "slagged" away from the nest, showing the intense heat they were under from the she-dragon's cleansing fire.


What to do to represent the nest was the most exciting part for me, there were so many cool options when it came to building a dragon's roost.  I decided to go with a simple earthen base, strewn with artifacts in its foundation and bedding made of a pile of coins!  Dragons love treasure, and this seemed to encapsulate that perfectly for me.


The she-dragon used a round shield, heraldic shield, sword, dagger, and skull to build her nest.


And here's the completed piece! 


One early bloomer is already pushing its way out of its egg.  The skull is evidence that some unfortunate human became the dragon's lunch, and then part of her nest.


This unlucky horse calf was another meal for the waiting mother.


The coins were sliced from a round plasticard rod and pressed into a green stuff foundation.  Though many casting companies use a "cold casting" technique that doesn't require vulcanization these days, I wanted to play it safe and go easy on the use of glue, which can melt in high heat casting and ruin the mold.  Most joins are made by adhesion to green stuff or Procreate.


The shield is beaten and worn, and was of no use to its bearer in defense against the expecting mother!


And here's Larry again with the finished piece, hopefully the dragon-mother doesn't come home while he's shambling about or he'll likely find himself part of her next nest!


That's it for this week and what's on my desk, I hope you enjoyed the custom sculpted dragon base.  I'm looking forward to making a whole series of these so an entire army can be dragon/wasteland themed!

Until next time, good gaming and happy hobbying!

Monday, October 7, 2013

Showcase: Abaddon the Despoiler

One of the most feared denizens of the Eye of Terror has emerged this week for a brand new paint job!  This was a 15-hour piece commissioned by Dave the "Aegman" for his chaos army.  Dave wanted a centerpiece model for his forces and so he asked for an Abaddon that would really stand out on the table top.  To get the job done right, we settled on a 15-hour paint job.  At that time limit, the painting starts scratching Competition Quality work, bringing in time intensive effects like source glow and ambient shading.  I can do both of those in a small way on Schowcase Quality jobs, but on a model as intricate as Abaddon, and with two light sources, I was going to need more time.  In the end, I was really pleased with how he turned out.

Now that the work's done, let's take a look!


Abaddon's basing is made from the mounted Archaon kit.  I've gotten a ton of utility out of that kit, first using Archaon and his steed for a Hades Vampire Counts conversion and then again using a smaller portion of the basing on a recently completed pyromancer.  I knew the rest of Archaon's base would look awesome with Abaddon towering over it.  The only decision was what glow I wanted it to be emitting.  I chose sickly green, or a "Minas Morgul glow" as I fondly refer to it.  I'm a fiend for this color scheme, it's a surefire way to make your featured baddy look unquestionably evil while he's standing over a pit of vile corruption!


The two glow sources on the model were going to be the corruption on the base and his sword, Drach'nyan.  His demon sword has a plethora of trapped souls contained within it and oozes raw power, so a spectral blue glow does a nice job on getting the point across.  With the sword as a heavy left-hand light source, I really enjoyed painting his face two-tone, with one half illuminate by spectral glow and the rest falling into shadow.


The right half of his body falls into a general shadow, being neither lit heavily by the sword or the pit, so I took the opportunity to add some much needed color and life into the eye-of-Horus on his shoulder pad.


And here is again from the front at ground level, the view his victims are treated to before they are summarily dispatched.


... Or the view you are granted while watching your friend get beheaded...

That's it for this week, thanks again for stopping by and checking out what I'm working on at the Monster Lab!

Come back next week and I'll be showing off a custom sculpted dragon chariot base!

Related Posts Plugin for WordPress, Blogger...