Monday, October 7, 2013

Showcase: Abaddon the Despoiler

One of the most feared denizens of the Eye of Terror has emerged this week for a brand new paint job!  This was a 15-hour piece commissioned by Dave the "Aegman" for his chaos army.  Dave wanted a centerpiece model for his forces and so he asked for an Abaddon that would really stand out on the table top.  To get the job done right, we settled on a 15-hour paint job.  At that time limit, the painting starts scratching Competition Quality work, bringing in time intensive effects like source glow and ambient shading.  I can do both of those in a small way on Schowcase Quality jobs, but on a model as intricate as Abaddon, and with two light sources, I was going to need more time.  In the end, I was really pleased with how he turned out.

Now that the work's done, let's take a look!


Abaddon's basing is made from the mounted Archaon kit.  I've gotten a ton of utility out of that kit, first using Archaon and his steed for a Hades Vampire Counts conversion and then again using a smaller portion of the basing on a recently completed pyromancer.  I knew the rest of Archaon's base would look awesome with Abaddon towering over it.  The only decision was what glow I wanted it to be emitting.  I chose sickly green, or a "Minas Morgul glow" as I fondly refer to it.  I'm a fiend for this color scheme, it's a surefire way to make your featured baddy look unquestionably evil while he's standing over a pit of vile corruption!


The two glow sources on the model were going to be the corruption on the base and his sword, Drach'nyan.  His demon sword has a plethora of trapped souls contained within it and oozes raw power, so a spectral blue glow does a nice job on getting the point across.  With the sword as a heavy left-hand light source, I really enjoyed painting his face two-tone, with one half illuminate by spectral glow and the rest falling into shadow.


The right half of his body falls into a general shadow, being neither lit heavily by the sword or the pit, so I took the opportunity to add some much needed color and life into the eye-of-Horus on his shoulder pad.

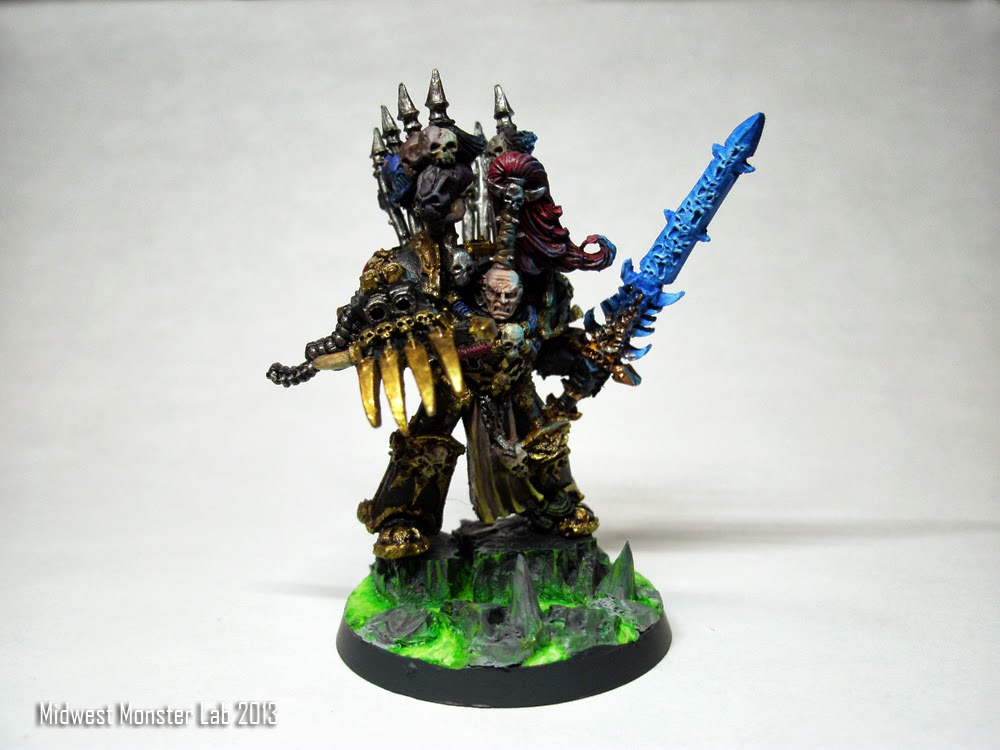


And here is again from the front at ground level, the view his victims are treated to before they are summarily dispatched.


... Or the view you are granted while watching your friend get beheaded...

That's it for this week, thanks again for stopping by and checking out what I'm working on at the Monster Lab!

Come back next week and I'll be showing off a custom sculpted dragon chariot base!

Tuesday, October 1, 2013

What's on My Desk: A New Airbrush Studio

I've finally had time to put aside the sculpting tools and get out my new airbrush!  At this year's GenCon I purchased a Sotar, Partriot, Badger tank/compressor, and full line of paints for under $450.  It was a great deal, and one that I couldn't afford to pass up.  To get my airbrush station set up, first we moved Harley across the room to where she has a larger desk and more space (that corner had previously been housing an old organ that no longer could play music).  I inherited her old desk and immediately put it to good use by building a brushing cubby out of a cardboard box.  I also taped a plastic to-go cup to one leg of the desk.  By putting another cup into that one I had a removable, and thus cleanable, place to dump cleaning solution.

With that it was simply a matter of hooking up the compressor and getting started!


I'm taking up all the window space now that Harley has moved into her new spot.  It's really nice transitioning to the painting/assembly desk over to the airbrush station.  To get more light I take my LED lamp and move it from one desk's corner over to the other's.  It's a great fit.


Harley got a nice new desk from Office Depot and has her KU diploma proudly hanging above it!


Back to the airbrush..  For my first project I wanted to ease into airbrushing by using my Patriot.  It's a general use double-action internal mix brush great for priming, and base coating.  Badger's president, Ken, was nice enough to throw in a couple of quick releases so that I could transition between Patriot and Sotar on the fly.  You can see it hanging down under the brush in this picture.  After cutting a small chunk out of the carrying case foam, the brush and QR fit snugly inside.


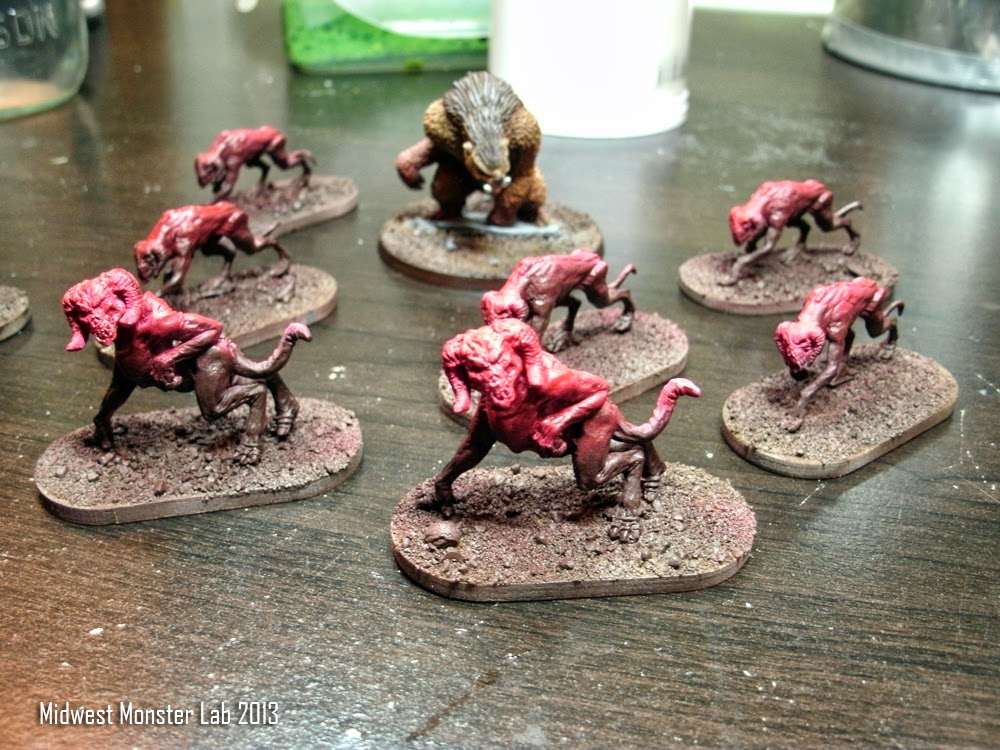
Here are the Freeblades Plankha (demon hounds) and young Grush that I airbrushed.  I did each model, from base up, with the Patriot.  It made the job super fast and allowed me to do a simple color gradient from brown to red in no time at all.


This order was for table top quality, so after their airbrushing, each plankha got three highlights and a few detail touch-ups.  Table Top is the most basic painting package I offer and the Patriot helps a ton with basing and quick shading while sticking to a budget.


Here's the whole group, ready to wreak havoc in Jason C's next Freeblades game!


This young Grush was also painted with my new Patriot.  I used it to do the basing, base coat, and under shadows on the model.  A quick dry brushing anda few detail points later and he was done.


Using an airbrush to quickly base coat and shade monster models was fantastic, and I'm glad I finally made the plunge this year at GenCon to get one.  I'm looking forward to using the 'brush more and seeing what the Sotar can do!  

Thanks for stopping by to see what's going on at the Monster Lab!

Until next time, good gaming and happy hobbying.

Monday, September 23, 2013

Update: Fimir Helmet and Tail Conversions

We're back with an update to last week's project, converting helmets and bladed tails onto Forgeworld Fimir.  Last time, the helmets were finished, but there was still work to be done on their tails.

They're finally complete, so let's take a look!


There were a ton of interesting options for creating the blade-tails, so I really let my creativity run wild.  Hooks, crescents, cleavers, spades, barbs, and daggers are all the styles of weapons I used to make them.  Each weapon was fabricated from plasticard and then accented with green to create straps, bolts, and rope to hold the blades in place.


I roughed up the edge on most of the blades by making simple "V" cuts with an xacto blade to make them look worn and notched from hard use.  It's nice to add a bit of wear and tear to weapon pieces, especially to those wielded by the disciples of chaos, too much their time is spent maiming and killing to keep their weapons shiny and new!


This is one of my favorite weapons, a truly vicious sickle big enough to cleave a man wholly in two!


These three got spade tails.  The tails and each of their blades were notched and then fitted together to form a snug fit before being finished with a dab super glue and some green stuff.  


The top left tail is a nasty set of barbs that was made out of three pieces of plasticard, one to form the main section with an arrowhead end and then two pieces that were fitted to the sides to give the weapon barbs on all four sides.


This guy's weapon tail has a spear-tip fitted on the end of his truncated tail and then simple rope bindings to hold a row of blades.


All of the fimir sacrificed part of their tail to augment it with something sharp and killy, this guy went the extra mile and grafted his blades onto his tail bones, requiring no binders at all to hold them in place.  Besides having two nasty spikes for slamming down into an enemy, his weapon also has a axe head for side-to-side sweeping cuts.


The nine fimir are finally done and will soon be in the mail to Michael for his chaos force, I'll be showing off more conversions he's requested soon; a demon possessed fimir giant and two ascended demon prince fimir!


Before I sign off for the week, I'd like to make a quick plug for Between Two Beards, a video project my brother, Andrew, and our long-time friend, Dave, put together.  The bearded duo have been doing game reviews and are starting to branch into live coverage and "let's play" content.  They're putting a lot of work into their channel and are really excited for the great projects they have planned, check them out on YouTube and stay tuned for even bigger and better content coming soon!


Monday, September 16, 2013

What's on My Desk: Fimir "Counts-As" Conversions

I'm back this week with a look at a work-in-progress commission for a returning customer Michael P.  Michael has come to rely on my modeling skills to add a special twist to his models, and this time he wanted work done for his Warriors of Chaos Fantasy army.  Nine fimir are acting as counts-as chaos warriors.  Each fimir comes armored and has a cool looking club, but Michael wanted the models armor beefed up to represent the higher save on a chaos warrior and to add weapons to their tails.

Let's take a look at the work so far...


Each fimir's helmet is unique, though some share stylisitic similarities.  These three I've dubbed: "Thor, Skullcap, and Storm Trooper."  

The entire time I've been working on this commission, I couldn't get over the fact that these Fimir look a lot of the Koopas from Super Mario World...


"Thor" is one of my favorites, his helmet reminds me a lot of the winged one from Marvel.


I think the "Storm Trooper" helmet style is very fitting for the fimir; subtle, simple, and perfectly round.


This next set has another storm trooper-esque helmet, a funky tri-horned one, and what I've come to think of as a miner's helmet with a single prow horn.  


Remove the horn and replace it with a lamp and it has a stunning similarity to this.


This guy's headgear captures a look from an old fimir helm that had a lot of design work braided about it.


Each fimir's tail has been bound, yoked, and tied with nasty barbs, blades, and spikes.  Like the helmets, each tail-weapon is unique and expresses the individual personality of the bearer.


This is another set of my favorites (though they're all really great), but I really like how (L to R) the storm trooper, miner, and magi turned out.  Magi... Yeah, the fimir's helmet on the far right looks like an esoteric spell casters headpiece to me.  


That's it for this week and what's on my desk, come back next time to see the other projects I'm work on a the Lab!

Thursday, September 5, 2013

Showcase: Pathfinder Elf Pyromancer

I'm back this week to show you a quick five-hour paint done for one of my role-playing clients.  This is a Pathfinder Elf Pyromancer with requested lava basing and flamekin familiar.


The basing is a piece of the Warhammer Achaon base cut to fit on a 25mm round.  Lots of people use cork board to do a nice simple cracked earth effect, but this this little gem was on hand I was happy to use it instead.

The skin tone is the Reaper rosy skin triad with a bit of dark brown added to make rings under the eyes.  His unhealthy pallor is what every mage should have.. too much time delving into arcane lore is bad for your health!


The rock glow was a gradual blend from 1:1 German Grey and Red Gore all the way to yellow.  For a piece with a longer time allowance I would definitely like to a glow from the lava up onto the pyromancer and from the familiar onto his head, arm and shoulder.


I've always wanted to do a lava base, and I had a lot of fun doing it on this model for the first time.


That's it, another painting commission down, now it's time to get started on some sculpting commissions.  I'll have converted Fimir and a Cygor to show you next week and an original sculpted dragon base after that!

Thanks for stopping by and checking out my work!

Related Posts Plugin for WordPress, Blogger...