
In keeping with the Greek-underworld theme, my Tilean Vampire Counts will be lead by none other than the lord of the underworld himself, Hades. Back when I first picked up the 5th ed VC book and read its fiction for vampires, I was blown away. I had never seen vampires portrayed the way I saw within its pages, as all-powerful masters of the undead. Before that they had almost exclusively occupied the role of assassin-lone-wolves in my mind. After that day, however, I knew right away that I wanted the omnipotent figure of Hades commanding an army of undead. Shortly after that I chanced upon some Alcanti Fellowship models and the pieces of my army fell snugly into place. Tilea, where the Fellowship hailed from, was modeled after feudal Italy. I had found the perfect home for my Vampire Counts.

Everything in my army attempts to incorporate some element from Greek mythology, so when it came to modeling my vampire lord I wanted to stay true to that spirit. Though zombie dragons are a true nightmare on the battlefield, it didn't quite fit with the theme (to my knowledge dragons never played a big role in Greek mythology). The idea of Hades racing about the battlefield on a midnight-black charger, however, seemed quite fitting. When modeling a nightmare/hellsteed fit for a lord, there really is only one choice, Archaon's steed.

The icing on the cake is that this kit comes in Finecast resin. I'm a huge fan of the new resin, it's lighter and a pure pleasure to work with (no, I don't miss errant shards of xacto blades flying at my eyes after hacking away on a piece of peweter).
I decided that Hades would stay true to the basis of the Archaon model, but with some notable exceptions.

I filed his sword down with an xacto and gave it a more graceful, slim appearance. I also removed the skulls hanging about the front of his cuirass, in favor of a bust of a gorgon. For his head, I decided to pin a skull from the plastic skeleton kit in place and use it as a foundation for an original sculpt.

Allowing the foundations for the sculpting on Hades to dry I bounced back to his horse (name as yet undecided) and attached the wire frame foundation for its wings. I decided upon Hades riding a hellsteed, instead of a barded nightmare. His ability to fly about the battlefield will more than make up for the +1 modifier to his armor save... though that would have put him at 0+.

To create the initial framework, I drilled a hole in each of the hellsteed's shoulders and inserted a unraveled paperclip. This is the outermost frame for the wing, a few more foundation pieces are still needed inside the wing.

I took another paper clip and cut it into two more pieces that will be the inner "fingers" of the hellsteed's batwings. To secure the inner foundation pieces I placed a ball of green stuff in the crotch of the wing's bend and pressed the wire into the 'stuff. If gravity wants to pull your supports out of place, prop them with something until they dry (~30min).

The positioning of the inner supports on the previous wing was quite simple, as gravity held each wire in place where I wanted it. However, on the horse's right wing, the supports threatened to sag. Because the supports are positioned upside down, there isn't a simple means to prop them up. Never fear! There's a trick that will cut green stuff's dry time down to a fraction of what it was. Apply a drop of super glue to the green stuff joint, and within a few minutes it will be completely secure! This is a technique that I use sparingly, but it is effective nonetheless.

With the hellsteed's wings setting, let's pop back over to Hades himself. When working with green stuff its best to work in stages. Now that the foundation pieces on him are dry, I rolled out a few eyeballs and glued them into their sockets. I used glue to secure the eyeballs so that I didn't have to mash them in (and lose their shape), in order to secure them.

We're going to fast-forward a few steps here (my camera ran out of batteries). At this point I have been layering on green stuff to create features on top of both skull foundations. I also rolled out some "snakes" for the gorgon's hair. Here's how I went about doing that.

Wet you fingers in a bit of water, wipe off the excess (you want your hands to be slightly moist, not damp or drenched), and take a pinch of green stuff in hand. Roll the 'stuff between your thumb and forefinger to elongate it.

After it has taken on a cylindrical shape place it on a flat surface and roll it with your finger like a rolling pin. To get an even shape, place your finger first where the chord is thickest and roll it while moving your finger to one end. Press lightly while rolling, and come back to the thicker areas and repeat the press and roll, until the chord is of approximately equal width.

For the gorgon's hair, I rolled a number of different sized chords. This is important because I will give the chords about 30 minutes to dry before attaching them. Now that the chords have taken their rough shape a little dry time will harden them slightly and allow us to bend them without fear of leaving finger prints or losing their shape.

While they dry let's move back to Hades' face. Once again we're working in steps, allowing areas to dry before working again. This takes a measure of game-planning and thought. It's important to take the time to size up the model you'll be sculpting and decide what will be done and where. That way you can move around the model and work on different details while not smudging what you've already worked hard to produce. I don't want to beat a dead hellsteed (pun intended) but this is the key to successful putty modeling and should always be kept in mind!
With that said, let's take a look at how to make details with green stuff. First, roll out a piece, in this case I'm doing a lip/jaw detail so it is thinner at one end and thicker an the other and placed it where I want it to lie. (If the you're having trouble with the green stuff slipping from its contact point, apply a small amount of super glue to hold it in place, but remember, where the green stuff is glued you won't be able to move or alter it, so apply a very conservative amount of super glue!)

Press the green stuff down at one end of its maximum length.

Secure the other end at its other maximum.

With both ends secured, work towards the middle, pressing the green stuff in, securing it to the model. Once secure contact has been established along the entire length of the 'stuff, press and manipulate to create details and final form.

Keep adding layers of detail as you build. At this point don't despair if your model is quite ugly, it'll come along at the end, have faith! If you still don't trust your vision for the sculpt, use anatomical images of facial muscles, bones, etc. for reference.

Now that the gorgon's hair chords have dried, I'll show you how to secure them. Because they're not completely dry, we don't want to mash them in to secure their contact point. Instead we'll use super glue. Put a small amount on a fine tipped applicator, I'm using a thing brass pinning rod.

Dab the glue onto the contact point on the model and place the chord. A small amount of glue will afford a surprising amount of stability, so once again, apply a conservative amount.

Repeat with a few more hair chords.

The gorgon's dreads are hanging all over the place, and that's ok. Let's tidy her up by giving her a weave.

Using a modeling tool and lightly touching with my fingers, I manipulated her hair into braids.
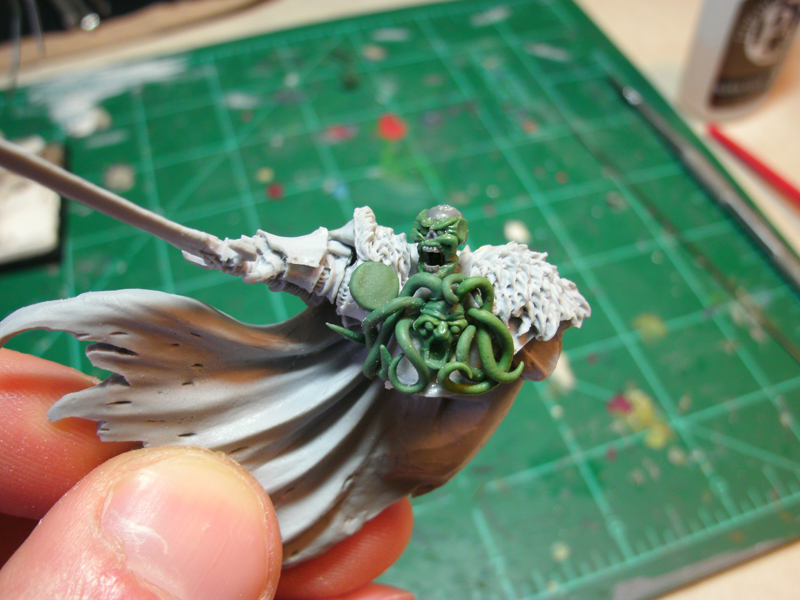
Gravity will pull some of the chords out of place, so where I want the hair to keep a bend I placed a small dab of super glue to secure that chord.

From here on out the rest is history, as I repeat the previous steps over and again to create higher levels of detail.

I wanted the crown to look archaic and foreign.

Here's the dark lord mounted on his hellsteed. All that's left to do is attach his left arm, model a shield, and finish the horse's wings.

Stay tuned for the finished sculpt! Any in-depth or other questions about green stuff modeling, what tools I use, or the like, feel free to ask.
Good modeling!
Very nice work and a great example of the conversion work that finecast offers. The greenstuff work looks good and the crown brings the vampire back from the brink of being lost behind the gorgon, which is a nice touch. I am looking forward to what you do with the wings. I have always been a little too scared of sculpting wings myself.
ReplyDeleteThanks Old School, I agree about the gorgon and the crown, though when Hades is seated on his horse you can hardly see the gorgon!
DeleteGreat tutorial. The model is really coming along. I like the Greek theme for the army. Can't wait to see it done.
ReplyDeleteThank you much, just wait for my black coach it'll be sculpted to look like the boatman of river styx!
ReplyDeleteVERY COOL!
ReplyDeletePlease show the finished painted model. Can't wait for the Black Coach too.
I loves me some great GS work! Can't wait to see the completed piece!
ReplyDeleteWow! That's really coming along beautifully. Well done man, can't wait to see more!
ReplyDeleteGreat work, what a fantastic theme. I love the way you built up the detail on the head. I've only recently bought my first finecast kit, and I'm looking forward to testing it out.
ReplyDeleteYour green stuff work is really excellent, but more than that I also love your basing!!! It's something that is so often overlooked but you've really made it interesting!
ReplyDeleteThank you all, it's been a really fun project. Check out what I got done on him this week!
ReplyDelete