
Along with the release of the new Vampire Counts rule book, this month has seen the release of some truly great new plastic kits. One that I was particularly eager to get a hold of was the Black Knights/Hex Wraiths boxed set. These are some fantastic minis, and were sorely needed to replace the old knights and skeletal mounts in the Vampire Counts range.
 |
| The end of the column above will be filled with putty to give it an appearance of having crashed over. |

In September I showed off a few of the green stuff conversions I had completed for my Tilean Vampire Counts. The honest truth is that I have been collecting VC's for over 5 years and had yet to play a single game! Still, every now and then a bit or model would catch my eye and I would add it to the collection and for the day when Hades and his undead legion would finally see the table top. That day came yesterday when I took on my brother's Skaven. In a 750 per match, I fielded 5 Knights, 50 Skeletons, 2 Necromancers, and a Varghulf. After committing some grievous rules errors (I forgot my units caused fear, that my skeletal steeds got attacks in combat, and that the Varghulf's regeneration save was 4+, not 5+) I got the ugly end of the Skaven beat stick. Next time I'll be ready and I'm going to go with more killy approach by taking a vampire instead of two necromancers and I will be sure not to forget my core rules!

The unit's champion, called a Hell Knight, was modeled like the rest of his squad with his horses hooves hovering off his base. This represents his mounts "spectral steed" ability which allows it to move as if ethereal, ignoring terrain. As the unit's leader I also wanted to give him a more heroic pose, and decided upon the classic "rearing steed" look.

The helmets and shields seen here are Black Lotus Tribe helmets and shields by MAXMINI, a third party company that makes resin conversion bitz and models.


Some of the Black Lotus Tribe helmets are a bit outlandish so I trimmed and repositioned a few of the horsehair crests for a more modest look.

The shields and helms really are a spectacular addition, and go a long way of representing the "Greek/Roman" look of the Tilean vampire counts.

In today's three part post we've already looked at the new Black Knight minis modeled with a Tilean flavor. Next we'll take a moment to congratulate January's M-m-monnsterrr (I couldn't resist) Lab Member of the Month, before ending with a tutorial on how to create scenic rocky bases.
Let's get to it.
A big congratulations goes to Mordian7th for being selected as the Monster Lab Member of the Month! Mordian runs the blog Mordian 7th Regiment, where he has been doing some truly inspirational work on his heresy era Thousand Sons and Regimental Guardsmen. If you haven't already, I definitely recommend stopping by his site, his super-heavy "Eye of Magnus" is incredible.

But what does being the Monster Lab Member of the Month mean, you ask? Each winner not only gets a feature on the Monster Lab, as seen above, but they also get an exclusive, members only, Lab t-shirt which are produced in very limited quantities (twelve to be exact). As this month's winner, Mordian will be receiving a t-shirt like the one below.

If you're still wondering how Mordian7th was selected as the Member of the Month, and want to know how you too can have a chance at winning, it's easy! Simply become a member of the Midwest Monster Lab and wait for your name to be drawn. Once each month I randomly select a winner from the blog's membership and mail them a free t-shirt. In December the last of the "Most Interesting Man in the World" tees will be given away and a new design will be created for 2013... that is if the world doesn't come to an end before then.
Last in today's three parter is a tutorial on how to create scenic rocky bases. These bases are great for setting the scene of any fantasy army which battles across sparse stone ruin landscapes.
To start you'll want to get a hold of some gravel rocks and a few pieces of plastic or plaster cast stone tile pieces. The pieces shown below were plaster casts made from plastic tile sets. Using plaster casts are great because they break into nice rough chunks extraordinarily well. If you can't get your hands on plaster cast pieces, any stone tile plastic or resin cast will do just fine.
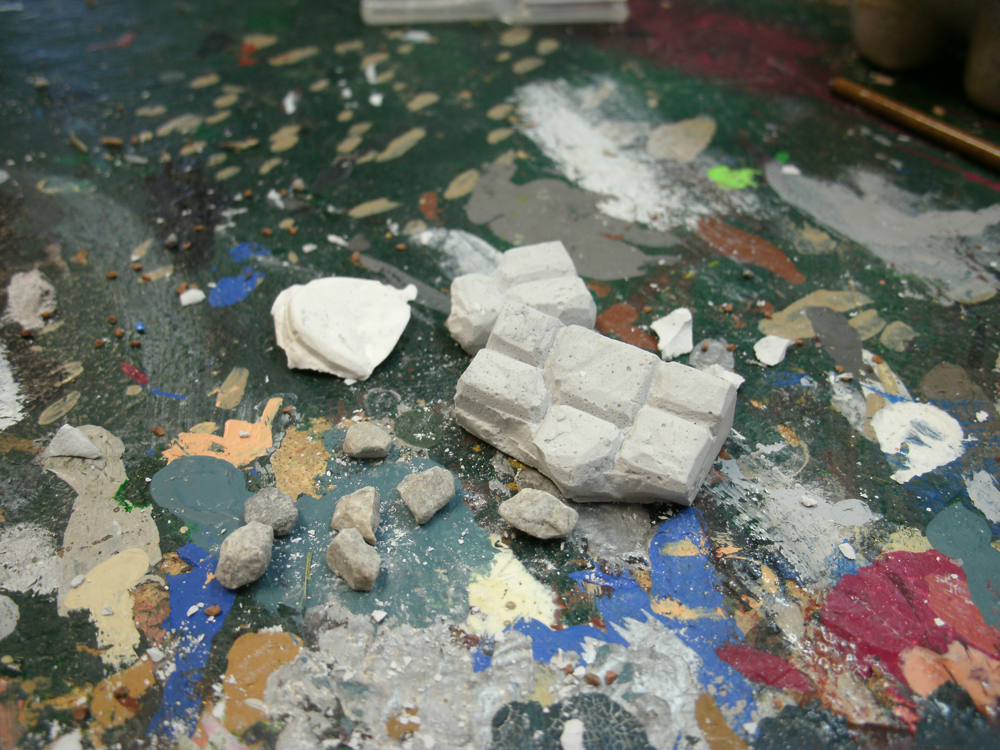
Break the tile chunks into individual stones or small groupings of stones.
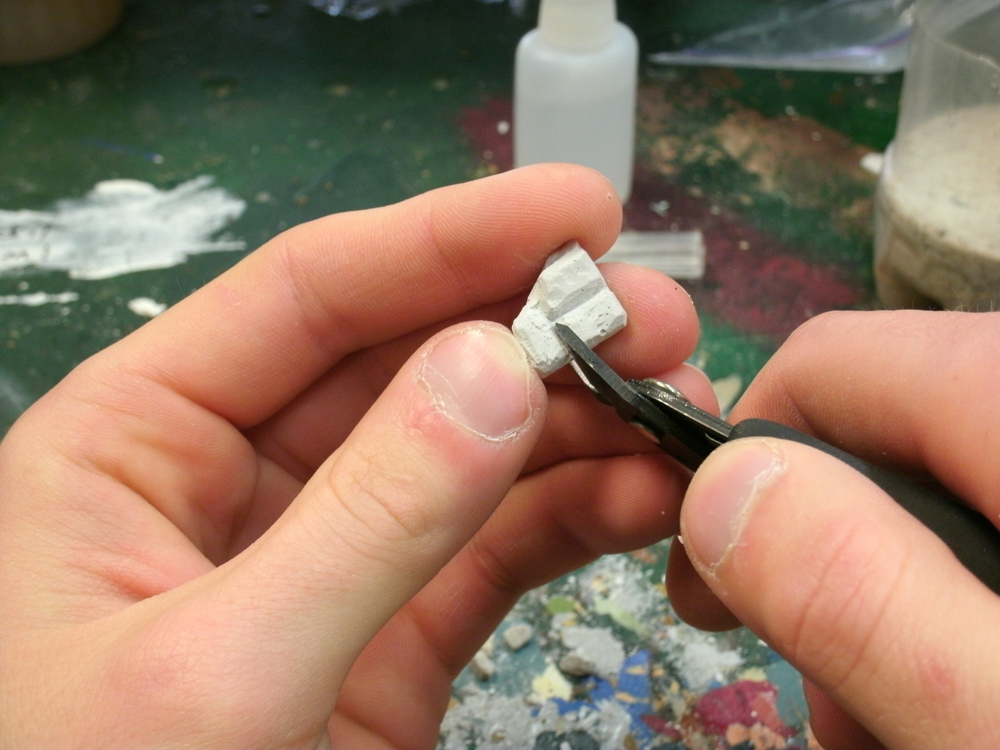
Spure cutters can be used on very small pieces to get clean fractures in the stone. Also the stones will sit very high if the bottom half isn't cut off or filed down. Besides cutting with a knife or a pair of clippers, you can rub the tile stones on a piece of sandpaper to wear into to a suitable thickness for placement on a base.

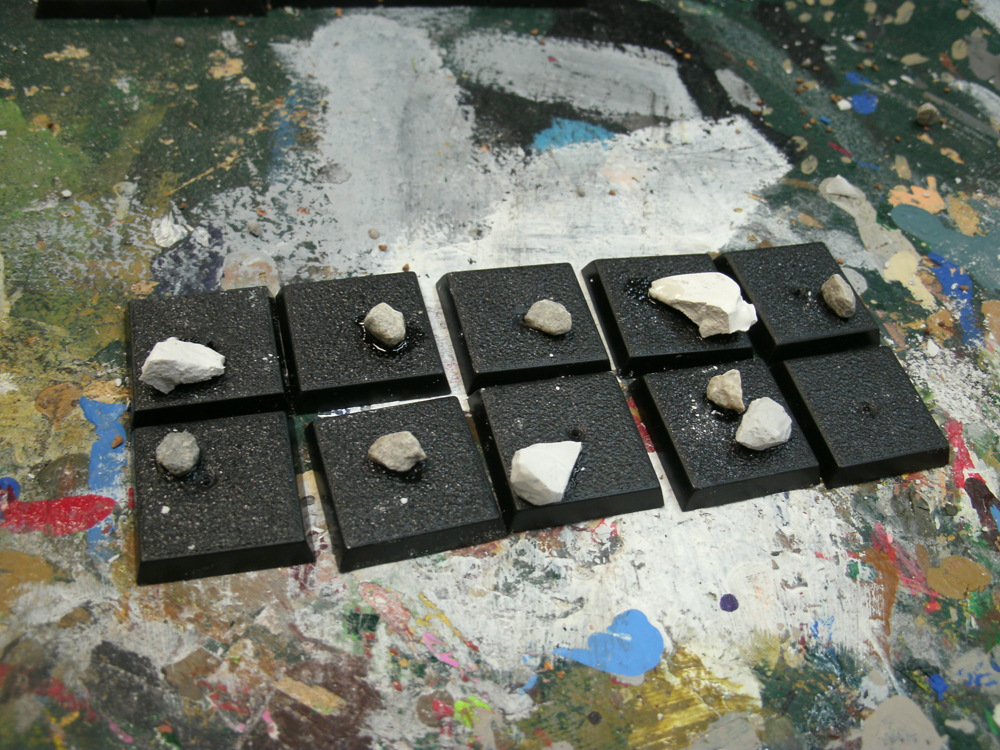
Take a few large rock (natural and tile fragments) chunks and place them on your bases, securing them with super glue.
I placed a few pieces that had an upward slope at the front of bases so that models on those bases could stand with one foot up on the rock and strike a heroic pose.

Next, we'll add a medium and large ballast for variation, apply dabs of all-purpose white glue (Elmers) around the rocks and slightly up the sides. Gluing ballast up the sides of the large rock chunks will give the larger pieces a natural "buried" look.

Pour your ballast onto each base. The ballast will settle into the glue on its own. Allow the glue to dry before moving on.

I prefer Woodland Scenics brand products and have mixed medium and large ballast in one container for variation and ease of use.

Mix a 50% water 50% all-purpose glue solution in a suitable container. You won't need a lot, so to save glue, a smaller container will do just fine.

With a "garbage" brush, one you don't use to paint, brush the sealer over the ballast. A good technique to do this is dipping the brush in the sealer and touching its tip to the ballast. Surface tension and osmosis will bring the sealer off the brush and onto the ballast. The end result is less of a brush stroke and more of a dab.
Note: though this is a "garbage" brush not meant for painting, wash it out between sealer and glue applications to keep it from getting gummed up and becoming useless.

Allow the sealer to dry, this will be visible by its loss of surface sheen, before moving on. The sealer will give our ballast the stability it needs and also act as a binding agent for our last application of basing material.

With the sealer suitably dry, apply dabs of all-purpose glue around the ballast.

With your garbage brush, spread the glue evenly across the base and all the way to the edge of the ballast. This application of glue will hold the sand yet to be applied to the base, while the semi-dry sealer will hold a lesser amount of sand over the top of the ballast.

Sprinkle sand over each base. A liberal amount will be fine, making sure to apply sand to all areas where there is exposed glue.

Give the glue time to dry before turning each base over and tapping off the excess. Take an xacto blade (hobby knife) and scrape off any sand sticking to the edge of a base.

Once again with our 50/50 sealer, brush or "dab" sealer onto the sand, ballast and any exposed rock chunk for a final seal. Allow the sealer time to completely dry before attempting to attach any models, at least 45 minutes to an hour.

The final product is a base that has a natural amount of terrain variation and buried chunks of stone/rock. It's the perfect terrain to tread upon while conquering the world!
Thanks very much! Love the base tutorial as well - they turned out really nice!
ReplyDeleteAbsolutely, thank you for being a part of the Lab. That's really great about you heading over to the UK. I'd love to go sometime soon, next year perhaps. Thanks for the kudos on the bases!
DeleteLove your black knights conversions and the base tutorial is pretty good as well!
ReplyDelete