
It's a been far too long since my last post.. a month to be exact, but a lot of great things have been going on and have taken a lion's share of my hobby time.
Foremost among them is my new painting and modeling contracting service. I'm really excited to now be a part of the professional painting community, and especially so because the Monster Lab will be my business portal and showcase in addition to the content that we've always provided.
My first painting commission was for the lead rules designer for the brand new fantasy skirmish game called Freeblades. This is super cool because not only is the game a ton of fun to play, but Freeblades is a home grown game by local Kansas boys.
Let's take a look at the minis.

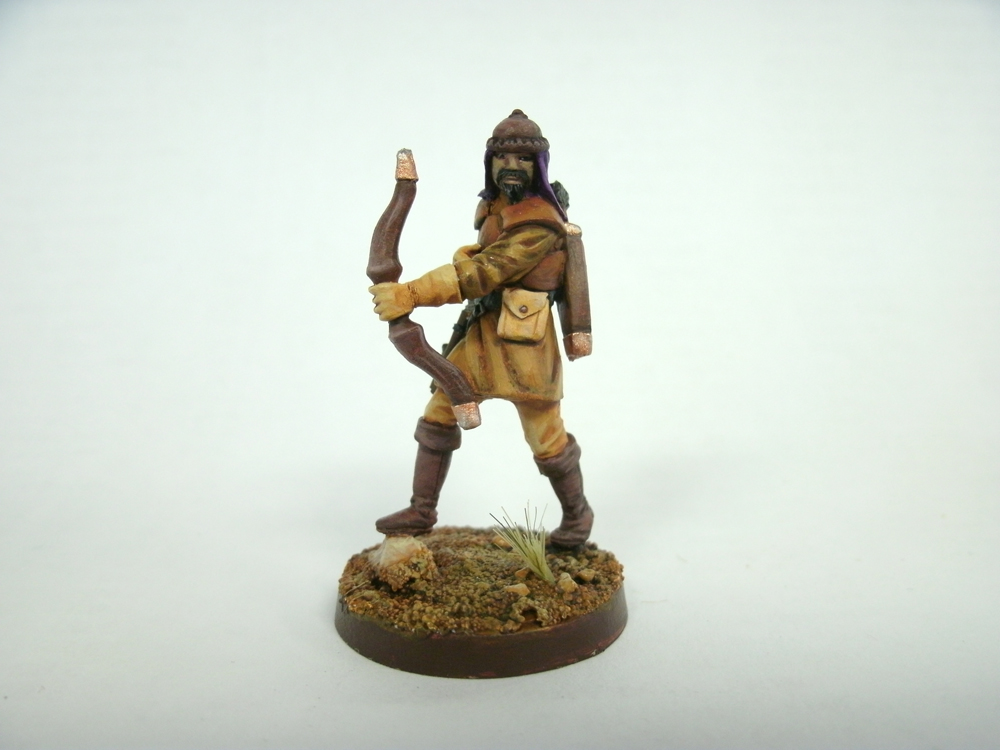
Jon's commission was to paint a freeband of Grular for his personal collection. I'd describe the Grular as lightly armored, fast moving, Mongol types. There were a ton of opportunities to give the models personality and a great deal of variation exists in the range to set members apart, but while still keeping group cohesion.

The leader of the band, Kor-khan, was an especial favorite of mine. I really enjoy the expressiveness of his face and his pose, he's about to whallop someone with that massive flail!


I freehanded the Grular's sigul, a rearing horse, on the Kor-khan's cape across a backdrop of purple, their clan color.


The Grular Warlock is another models that I really like. I decided to give him blue irises to depict the magical energy flowing through him.


The Gadarl demon is an incredibly fun model to paint. To represent the model's ability to shape-shift I painted it to match the colors of its base at the bottom of the model and shaded it lighter to the top to support the illusion that it is rising out of the ground and taking shape.

Its tabard was another opportunity to show its otherworldly nature. I wanted it to look like it was shimmering between realities, manifesting as a piece of cloth and fading out of existence to show a star-field beyond.


The Krang makes no mistake as to his intentions, he's here to shed blood! Again, this miniature was a joy to paint, and again the look on his face (one of determined blood lust) really makes the model.

Brass, leather, and animal pelts feature predominantly within the Grular freeband. The idea was to color their clothing with colors that would be found within their native step-lands.


To give this Grular Marauder the effect of sighting down his bow, I painted one eye open and the other closed. He's only mere moments before he looses an arrow into his prey!


Another of the Grular's more esoteric units is the Skethar demon. I went with a classic red devil paint to highlight his capricious and malice nature.

I know that skin tones are the bane of many a hobbyist's existence (I hear the groans and grumbles up at the store often), and painting the olive-hue found on Grular is possibly even more so. The idea is to give them a natural skin color while adding in a shade that separates them from typical brown tones.
Following is a simple tutorial that will walk you through building a realistic skin tone by layering blended shades of brown and olive green.
First, you'll need a wet palette. If you're not familiar with using a wet palette or don't own one, check out these two articles: how to make a wet palette, and how to use one.
Next, apply a pinky sized blot of dark brown and olive green to your palette as shown below. I used GW's Scorched Brown (Rhinox Hide) and Ogryn Camo.

Lightly mix the two paints by dragging your brush from the green into the brown, touching the brown and then mixing the two colors on the side.


Mix the blended brown/green across the palette by touching your brush to the brown as you go, dragging a small amount into the blend.
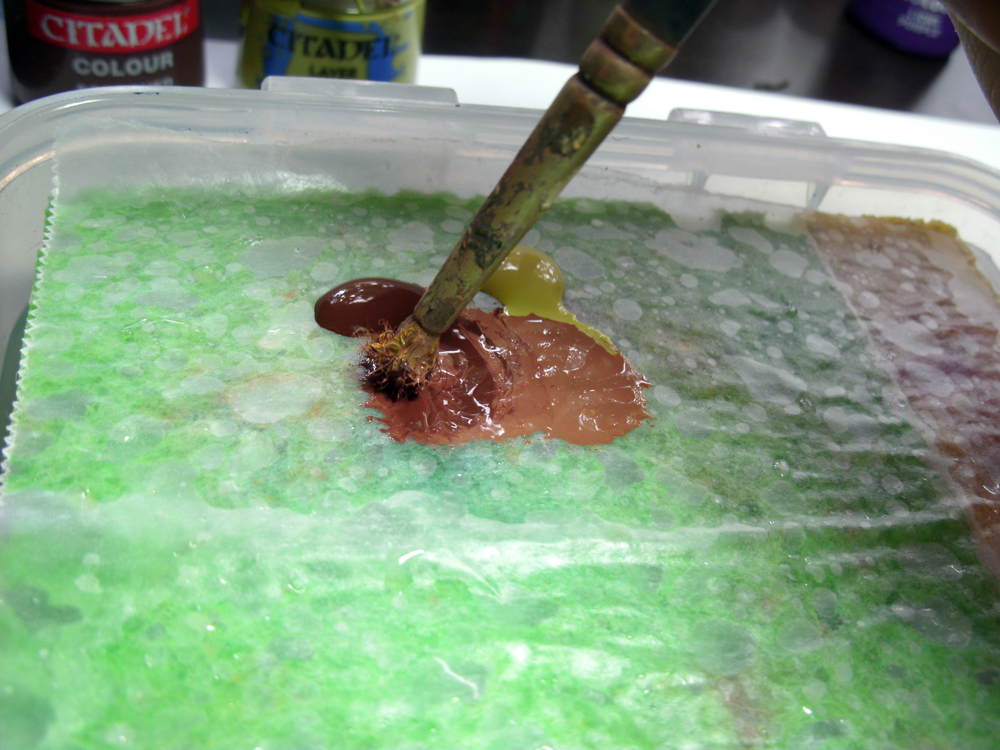
Once you have blended the shade towards the brown spectrum, wash your brush, and go back to the middle shade and repeat the process, but instead drag in more green to create a lighter green intensive shade.

The finished shade gradient will look something like this:

Taking from the darker side of the palette, base coat areas that are flesh tone.

With the base applied it's time to build some depth by adding a wash. I used GW's Agrax Earthshade. Apply a liberal amount, enough to darken all the crevasses and cracks in the model's face/hands, etc.

Now that the model has been shaded, building a lighter olive-hue is simply a matter of adding layers of paint from the lighter side of our palette. Going one step to the right I took a higher green content shade and painted most of the Warlock's face, omitting the deeper cracks in his face.

Again I used a lighter (higher green content shade from our gradient) to paint the raised surfaces of his face and hand. The key is to paint less of an area that you did previously, this will step the layers into one another in a gradient. With each subsequent lighter shade of paint, paint in narrower widths that you did previously, taking especial care to put the lighter colors towards the highest raised points on the model's features.

The paint used here is well into the greener side of our gradient and is painted on only the highest surfaces of his features.


After one more brown/green layer I used a shade that was almost entirely green and hit the tip of the Warlock's nose, his cheek bones, brow, and the raised edges of his fingers.

Now he's done! The skin tone isn't overwhelmingly green, but it isn't purely brown either.


Nice job, Matt. I look forward to getting to play this group, as I've had nothing but Haradel and Elves the last few weeks.
ReplyDeleteHa ha, thanks! Yeah I see you playing Matt's knights often.
ReplyDelete