This week I'm finally ponying up a promise to Jason C. and finishing his free Falkaaran Fire Wizard. Jason won a small trivia contest I offered on the DGS forums, where he had to guess the video game character that I took inspiration from for a paint job on a Haradelan Archer. Click the link, you guess who it was?
If you said Link, from the Legend of Zelda, then you'd have been right! That's what Jason guessed and for his prize I offered to paint a model for him for free. He chose a Falkaaran fire wizard for his mini, and after a few months of playing email tag, we met up and I finally got the model on my desk.
Let's take a quick look at the modifications behind the conversion and then a few more pics of the finished project!
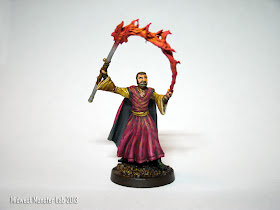
The fire wizard is a cool model with a lot of potential, but to me, it's up to the hobbyist to really make the model shout, "I'm going to hurl some hot fiery death at your face!" With that goal in mind I decided to do a conversion, adding trail of flame arcing from the wizard's casting hand up to his staff. To get the job done I'd need my pin-vice, a pair of jeweler's pliers, a piece of super thin brass rod, a paper-clip, and some good old green stuff.
To start, I pinned a paper clip into his staff-arm allowing him a larger range of motion and the ability to hold his staff high above to better demonstrate his dramatics (fire mages are a showy bunch. A bit of green stuff filled the gap nicely and fleshed out his sleeve to gel with his torso.
Next came the work on the most important part of the conversion, the flame trail. I wanted to use the thinnest brass rod I had to be the support for the green stuff flame I had yet to sculpt. This was for two reasons: the flame would be very thin at his hand and I didn't want any rod to show, and using a very light rod allowed me to easily get a smooth bend I wanted for the arc.
To attach the rod, I pinned it into the wizard's left hand and then worked along its length with a pair of jeweler's pliers bending it to get a nice subtle curve. I marked where it met his staff and then drilled a pilot there, fastened the rod and completed the arc. Now all there was would be to sculpt the flame!
Unfortunately, I got a bit distracted with my time constraint and didn't take any more WIP pics from here, so hopefully those who are wondering about the exact details can make do with a brief explanation and the completed paint pics.
To do the the green stuff flame (which I am a novice at and am eager to try different approaches) I wrapped 'stuff around the rod first, smoothing it and pushing it into what would look like waves. Finally, I added tear drop pieces to the arc, fastening their fattest part to the arc and pulling the narrow end into wispy tongues of flame.
After that it was up to a killer paint job to drive home the effect. I know a darker set of base tones would have really made the source lighting stand out, but I decided on day-time lighting so that the whole model was clearly visible.
On his robe, I incorporated a pattern of cool diamond and flame designs to give a little umph to such a broad surface.
For his wardrobe I went with a rich red to emphasize fire, ash gray for contrast, and cloth-of-gold for his under tunic. I seesawed a bit on the choice between using gold or silver, but in the end the MacDaddy of metallics won out and it was definitely gold. Who'd want to wear silver anyway?... proabably these guys.
And that's it for this Falkaaran Fire Wizard conversion and what's on my desk this week! Congrats again to Jason for knowing is iconic video game characters and giving me the opportunity to do this project!
Come back next week to see the freshly painted Freeblades minis I'll be showing off.
Thanks for stopping by, and as always, happy hobbying and good gaming!


Excellent job. That looks really nice!
ReplyDeleteThat is really cool! Love how the flames turned out (both sculpting and painting) - great work, man!
ReplyDeleteThanks guys! I really do need to get my hands on an airbrush.. that would make lighting and shading so much easier. ha ha
ReplyDelete