Pages

Sunday, October 30, 2011

Building a Display Board Part 2: Scenery & Details

This week we're picking up where we left off in constructing a display board. Last time, as you may well remember, we built up the board's foundation with two simple materials: composite board, and insulation board with the use of a hand-saw, a box cutter, and some all-purpose glue.

As we continue this week, here's the tools/materials we'll need:
3. Box cutter
4. Shop vac
5. Fine grain sandpaper
5. Felt tipped marker
6. Small caliber x-acto blade
7. Plaster, I use Woodland Scenic's Mold-A-Scene Plaster, it incorporates a light weight ballast which gives the texture an integrated rocky appearance


Now that the foundation's glue seal has set for a least 24 hours we're ready to continue with the construction of the board and get started on the fun part, building terrain.

In order to create organic transitions between the layers on our board, we first need to ready the layers by trimming their edges. To do this, run your box cutter at an oblique angle to the corner, making sure that your cut pierces the foam on the lower side. What this does is remove the sharp corner on the higher layer, readying it to be smoothed to meet the layer below it.

This is what the top layer's edge should look like after the corner has been removed.


Now that there is a smoother surface, we'll continue the transition by brushing the edge with our steel brush. Apply enough pressure to shave off the foam while brushing, but don't apply too much pressure that you start creating deep grooves. After you have brushed in one direction, turn your brush and come at it from another direction. My method is to brush down the slope I wish to create, and then turn my brush perpendicular to my previous strokes and brush the face of the slope. This will ensure that unnatural grooves don't form from brushing in only one direction and a clean slope forms.

Use your shop vac to suck up the foam debris often, this technique creates a mess!


Make the slope gradual, this will keep your models from having to struggle to keep from falling over.

To finish the slope-transitions, sand the slope with your fine grain sandpaper.


For the lowest of the three levels I'm choosing to have an abrupt transition and will keep the straight up and down edge. This will effect the appearance of a retaining wall.

Sunday, October 23, 2011

Building a Display Board Part 1: The Foundation

With armies on parade taking a leading role at GW events and garnering lots of praise. Therefore, it's only fitting that this post focuses on the basics behind making a foundation for an army display board. We'll be taking a look at creating a display board in parts, first, focusing on the board's foundation, second, creating terrain effects and scenery fit for an army, and third, painting and finishing the board. I'll take you along step-by-step as I create the display for my Daemons of Tzeentch army, let's get started!


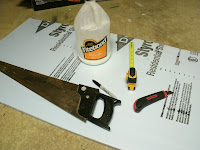
First we need to gather together our tools and supplies, we'll need:
1. 1/4" thick wood board (not pictured), I used composite board for its rigidity
2. 1/2" insulation foam board, sold in 8'x4' sections
3. Handsaw or other wood cutting device
4. Box-cutter
5. Glue, I used Titebond all-purpose
6. Tape measurer
7. Felt tipped pen
8. Applicator (not pictured), for spreading glue, I used an old paint brush


Start construction by marking two 2'x2' squares onto your insulation board. Cut them out with your box cutter, a three/fourths deep-cut on one side of the board and then bending on the seam should give you a clean split.


Cutting out two sections will give us the ability to create a good measure of gradation to the terrain. If you don't want to have any hills or only slight change in terrain elevation, one 2'x2' section will do just fine.


Next, mark your base board with a similar 2'x2' outline and cut. Yes, I did feel old school using a handsaw. A point of note, keep the saw as horizontal to the plane of the board while cutting, this will give you a straighter cut along your line. Dipping the saw "nose down" will allow you to easily wander off your line.


If the board is warped and doesn't sit flat on the ground, get another piece that will, you'll regret a wobbly board later!


Put on a liberal application of glue to the wood board surface.


Use your applicator to spread the glue evenly across the board, making sure to get glue all the way to the edge. If you're working in a location where you don't want to make a mess, put down a tarp or plastic sheet to prevent overflow from marring your flooring surface.

Saturday, October 1, 2011

The Sartoris Campaign and A Table for Home


The dark shadow of war is slowly casting its midnight pall over the Sartoris System, a system of three planets, ruled over by a yellow sun, and an entourage of eight moons. It is a region of building darkness, where menace hides its traitorous visage amongst the teeming masses of Aequus Hive and manufactures its plots on the forgeworld Lux. Something sinister is even rumored to stir beneath the surface of Reach's enigmatic surface, whispering dark promises. In preparation for the coming conflict, armies both local and from afar are amassing on the system's borders and hastily shoring up planetary defenses. It is in this time of rising upheaval that only one thing remains certain, the grim darkness of the far future promises only war!

For the past few months I have been working on the details for a 40k campaign, and at long last the battle for the Sartoris System has begun! The campaign will rage across the three main planets: the mining colony on the gas giant Vitral, Aequus Centrus the main hive city of Aequus, and through the manufacturing district of the forgeworld Lux. In addition, some of the planets' moons will be up for conquest: Vitral's forest moon Sinceros and craggy moon Canis, Aequus' outpost moon Reach, and Lux's sun scorched rock Crassus.

This is a really fun opportunity to play some unorthodox games, and use a unique set of rules made to simulate total system combat, there's even a mechanic for fighting ship battles and scuttling blockading fleets! As the campaign progresses the map below will be updated on a weekly basis with which territory is held by which faction, where each player's fleet is currently at anchor or in orbit, and what planetary resources have been claimed. Check out our campaign page on facebook!


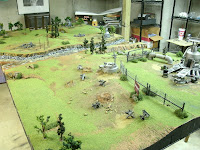
A really cool aspect of the campaign is that some battles must be fought on specific tables. An example of this is the moon, Reach, which contains only one territory tile. All battles fought on Reach must be played on the table in my basement.


I built this table in high school a few years ago and it has been a great investment. When friends want to come over and play late night or in privacy my table is our venue of choice.

The table features 4+ cover saves in the form of trees, rocks and ruins; 5+ cover saves in that of bushes; and even 6+ saves in that of fences. I hardly play games elsewhere where a 6+ cover save is taken, but I suppose it's better than nothing!


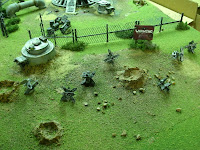
Reach features a fully functional Imperial Guard outpost, complete with perimeter fence, mine field, tank traps, perimeter defense guns, and interior defense emplacements. Unfortunately for the guardsmen stationed here, they were the target of a particularly brutal assault. One of my favorite casualties is a guardsmen reduced to his boots (there's a pair of boots around back of the outpost where he was snatched out of them, see if you can find them!)


In addition to the guard outpost, a collection of four ancient shrines lie off to the west. The purpose of the shrines is mysterious and their geometric ornamentation is thought to be of some significance. The ruins predate that of most known civilizations, and most assuredly were not built by human hands.. were they built by some sort of pre-race of old ones?


Something sinister has been taking place on Reach, and as evidenced by these corpses it has something to do with Chaos..


A raging river splits the table almost in half... obviously the guardsmen planned on putting their amphibious Chimeras to good use!