Pages

Monday, October 29, 2012

What's on My Desk: Adding Green Stuff Flair & Making a Convert

This week we're taking a look at what's on my desk and revisiting the fantasy realms of Freeblades and Ravnica!  This week is also a return to commission work for me, as I have spent the last seven days kicking back and... hobbying, on my own model for a change.  

In my last post I spent some time detailing the progress I have been making on Kairos, Fateweaver and his exploits on the table top.  He was a ton of work, and after what seemed an eternity of basing, washing, highlighting, rebasing, rewashing, and more highlighting, he's finally done!  Next week I'll be showing him off in all his chaos glory in a hobby showcase!  (The chaos manifestations on his base are a favorite, both goofy and creepy!)

But like I said, this week Kairos will have to wait.  We're headed off to the counties of Haradel to add flavor to some stock minis with the simple addition of green stuff modeling epoxy.


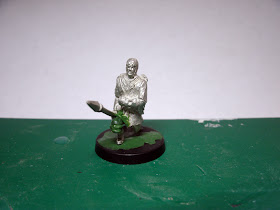
First on my desk is a Haradelan militia spearman.  I've done this model before for my long-time client Jon C and wanted to give him something different.  Taking a look at the model I noticed that his feet/legs could easily be bent into a crouching position.  A quick cut to his forward leg and the insertion of a bent pin and his forward foot was reattached.  For a lot of projects I've used Gale Force 9's brass pinning set, but for this one I used Privateer Press's Formula P3 pins because they are more pliable.  The P3 line also has a selection of super fine pins that are great for fine pinning jobs like resin and small parts/hands/weapons.


With the pin secured and bent to shape I applied a base layer of green stuff to flesh out the leg, giving me a shaped surface to work on.


Allowing that to dry ~30-40 minutes I put another layer on top, one that would give the militia man's pants their final shape.  I used the narrow spade tool from the GF9 modeling tool set, another item I picked up from my local store 31st Century Games & Hobbies. (If you are in the area, I highly recommend that you stop in, the owner Joe is in 6 days a week, is open to midnight and is a super nice guy).


Leaving the leg to dry overnight I finished up by adding a strip of green stuff to act as a hem for the MM's tabard and another strip sculpted to clean up the top of his boot.


A few simple steps later and Jon's next MM will be in a defensive crouch, ready to take on a an oncoming charge or launch a devastating thrust up under an opponent's guard!


Another model making a repeat appearance on my desk is this apprentice knight.  Last time I did an apprentice knight of Barek (boar aspect).  This week's model is an adaptation of that model (minus the goatee and swapping a claymore for the battle axe) and is an apprentice knight if Vidunar (lion aspect).  Since the models are so similar I wanted to do a few things that would set them apart in Jon's collection.  First I cut out the skull between the knight's feet and bent back his rear leg giving him a striding posture.  Next I grabbed a length of green stuff and sculpted him a ponytail.  The last additions (not added yet) will be some lengths of ribbon draped about his claymore and arms and a string to tie back his hair.


A model making its way onto my desk for the first time is this Vekul snow beast.  The model is pretty basic (a big hairy hominid) with a very yeti-like posture.  Abominable snowmen always seem to be a tad on the creepy "I'm gonna grab ya" side and this guy fits that perfectly.  To dress the model up a bit I felt like he could use some variation to his smooth body hair.  Additions of course hair to his knees, groin, chest, shoulders, head, and back give the model a bit more body and protect the portions of his person that would be most vulnerable to the cold.


I've been hard at work on hobby projects, but I've also been busy slinging spells across the table as well.  On many a Friday night I head over to 31st Century to participate in their weekly Magic: the Gathering tournament.  Playing cards is a nice way for me to get a few hours of gaming in before or after hobbying with little or no prep needed, play a few hands and its back to the hobby desk.  It's also nice to have a low investment activity that I can still nerd out with that doesn't involve models and breaks up the routine.


Anyhow, my card playing status ratcheted up a notch this last Saturday when I won the Return to Ravnica Gamesday event held at 31st with my white/black/green token aggro deck.  Among the prizes I walked away with was this spiffy playmat featuring a Nivix Guildmage from the Izzet Guild.  I'm an avid enthusiast of illustrative art, especially fantasy illustrations, and the art on this piece is absolutely stunning.

Which brings us to the last part of this week's title.  When I started playing cards to take a break from hobby I promised myself I wouldn't play with a playmat (how unnecessary!).  But after winning this bad boy I think I'm going to be a convert to the cause and sport my playmate proudly when I sit down to sling some spells!


That's all for this week and what's on my desk, come back next time and I PROMISE (I know I promised it would be this week) that I will show off pics of the completed Kairos, Fateweaver!

Happy hobbying!


Monday, October 22, 2012

What's on My Desk: Tzeentch Demons

I'm taking a break this week from commission painting and working on one of my own miniatures for a change!  This week I'm revisiting an old friend, Kairos Fateweaver.  Kairos has spearheaded and supported countless incursions into realspace for me, attracting fire from entire Imperial Guard battalions and space marine companies, and miraculously emerging after the dust settles with nary a feather ruffled.  He has stood amongst a raging horde of sixty ork boyz squawking with disdain as hundreds of their attacks bounced away harmlessly, or never found home at all.

Kairos is one of the most powerful single models in the game of 40k.  With three shooting attacks that can be aimed at three different targets, three wounds, and a 3+ re-rollable invulnerable save to back it all up, it takes an army's worth of firepower to bring him down.  Did I mention he confers re-rollable saves to any friendly unit within six inches?  Yeah, one tough cookie.  

With so many stellar performances recalled from memory I can turn a blind eye to a handful of his less glorious moments.  Specifically, fleeing back to the warp after suffering one unsaved wound from the first model to shoot at him.  Yes, he will vanish from the battlefield if he fails a leadership test after suffering an unsaved wound.  This dipole of incredibly awesome and unpredictably devastating, that Kairos inhabits, makes him one of my favorite units in the game and undeniably one of the coolest.


You might remember the numerous other appearances that Kairos has made on the Lab Blog.  First cameo-ing nearly a year ago in a four-part tutorial detailing how to make your very own display board (at this point he is merely primed white).  Then Kairos resurfaced again when he received a bigger better spot to stand on in a version of 'pimp my base' a month later.  I have since pulled him out and applied a well intentioned base coat only to leave him again languishing on the shelf for another spate of long months.  Later this week however, he'll finally receive the attention he deserves and be completed!


I really wanted the tome on his staff to look like a venerable grimoire.  For the cover colors I chose a deep red, achieved by mixing 2:1:1 of Khorne Red, Mournfang Brown, and Rhinox Hide.  The metal pieces were painted with a layer of Hashut Copper washed in a liberal application of Agrax Earthshade.  Kairos is also covered in a ton of tiny beads, teeth/claws/fangs, chains, and sigils.  Some are painted in metallics and some in bright colors.  His staff is old wood, grading from dark brown at the bottom to medium brown at the top.  The black cloth pieces on the model will have star fields and celestial scenes painted on them as well.  Basically all the little details will supply elements of change/magic to bring out the other-worldliness of his character.  Stay tuned next week for the finished piece!


Kairos wasn't the only miniature in my collection to have the dust blown off it and a bit of elbow grease added.  You might remember this Tzeentch chariot when it made an appearance in the second post I wrote for the Monster Lab detailing how to make a wet pallet.  I was waiting on a resin or plastic screamer to be released in order to finish the model and was delighted when GW released their fantastic new plastic kit.


I wanted a very loose connection for the link between the screamers and the chariot itself.  I imagine the chariot following the two beasts, moving in complete harmony.  Such is the machinations of Tzeentch that his minions have no use for something as mundane as reigns or chains!


I won't ever put paint on this model as it is going directly from my work desk to the collection of Tzeentch demon player, but it was great fun making the model from scratch.


Last on my desk this week is... movement trays!  Not the most exciting hobby item, I know, but an essential one.  I have been making movement trays for a repeat customer of the Monster Lab's contract services for quite some time now.  The price per tray comes out to around $4 a piece (depending on size) and are custom cut and fabricated by hand to your specifications!

Each tray is meticulously crafted to exact measurements and is given a final sanding to ensure that they glide smoothly over your chosen battlefield.

Contact me at midwestmonsterlab@gmail.com to order up a custom set, a hand sculpted model, or commission paint today!


That's it for this week, stop by next time to see What's on My Desk!

Tuesday, October 16, 2012

Showcase: Knights of Raman and Grular Lifetakers

This week I'm back and the Haradel and Grular conversions I showed off last time are done!


This questing knight of Tahnar was a model I spent considerable attention to during the conversion process, adding a cape, helmet crest and shield crest.


His tabard is painted in the county colors of Raman, red and gold combatant.  For the sigil on his chest I deviated away from the classic three tower silhouette and instead opted to depict a raven entering flight.  It seemed right that someone so emblazoned with aspect iconography would give a shout out to his homeland with his colors, but epitomize the aspect he represents as much as he could.


I'm pretty happy with the cloak.  It has a good flow and dynamism that gives a lot of motion to the figure.  Coupled with his sword which says, "onward men!"  The whole thing appears very cinematic.


The second piece for the Haradelan freeband is this apprentice knight of Tahnar.  Like the questing knight above, she is a disciple of the raven aspect and hails from Raman County.  She's not yet a full initiate into the mysteries of Tahnarian warfare, so instead of doing the questing knight's jet-black plate I added in a touch of black to the Leadbelcher I was using to give her armor a darker shade than regular steel.


Her shield proudly sports the sigil of Raman County, the three towers on red and gold combatant.


When I picked up this latest batch of models from Jon C. I asked him for the personality and any distinguishing characteristics of the aspects/counties they hailed from.  "Definitely long hair for the apprentice knight," he said, "that's very much in line with the raven aspect."  So, when I got home I gave the current mini a haircut and sculpted on some new locks.  I think the end result is pretty good.


Since I'm painting models for the personal collection of a client, I want to give them something that they're both proud to field on the tabletop and then, maybe even something they might not necessarily have thought to do themselves.  I've painted apprentice knights of Tahnar for Jon before.  The opportunity to do something new is what really makes the difference for both his collection and my monotony!


On my desk for conversion were also three Grular Lifetakers.  To spice these wicked ladies up I didn't mess with the structure of the model, but merely tweaked the arm positioning of some and added arrows to others.


Each model's bow got a bowstring made of real human hair!


Two of the Lifetakers got face tattoos, this one has a single tear drop.  I call her "the Weeper."


Here is one of the Lifetakers that got an arrow.  Here bow is pointed down like she is stalking her prey and her eyes are peeking off to her side.  I imagine her as readying her bow before spinning and launching a kill shot.


The third and final Lifetaker has her bow arm bent to put her weapon into a readying position.


Note the arrow is actually knocked on the bowstring!  This model also has a face tattoo, a serrated sun under her right eye.


I did finish two other models this week (I had the honor of being the first to put paint to pewter on them too!), but since they are still yet to be released, their debuts on the Monster Lab will have to wait.  

Stay tuned for more commission and personal work and to see what's on my desk next time!

Friday, October 5, 2012

What's on My Desk and a Sneak Peek!

This week I've got a lot on my desk!  I'm converting a Haradel Questing Knight and adding some modeling umph to a few Grular Lifetaker models by fabricating arrows for them to shoot from their bows.  To finish off this week's post I'm also going to have a sneak peek teaser of two future releases from DGS miniatures!  

Without further ado, let's take a look at what's on my desk this week.


I'm back to working hard for Jon C, lead rules designer of DGS's game system Freeblades, on a few models for his personal collection.  Jon sent me a questing knight of Tahnar with instructions to spruce him up.  He described the model as being dedicated to the raven aspect of Haradelan mythology.  "A raven feather cloak would be great," he said and so I decided to do that and add a few other accent pieces to bulk out the model.  In the end I centered my attentions around three things, his shield, helmet, and the cloak I was to fabricate.  Let's take a look where I started and I'll detail the construction process.


The model had a good base, so I wanted to build on that to add bulk to its shoulders and broaden the model as a whole (it was an early sculpt for the range and is slimmer than the newer models).  First up was the shield, a piece I wanted to use to broaden the mini.  I decided a raven wing crest on the shield would do this nicely and further the imagery the model is based upon.


I outlined the wing shape on a piece of medium gauge plasticard and cut it out.  A quick trimming on the wing tips to take off the sharp edges and a filing to add depth to each feather and I was done.


Next up was the cloak, a trickier proposition.  First off I sculpted the cloak, a process that I've detailed before here and won't trouble you, the reader, with again.  Once the green stuff had dried and was shaped I started the process of creating the feathers.  


Each feather on the cloak was either a line of feathers like the one seen in the middle of the cloak that was cut in bulk from super-thin gauge plasticard, or like most of the feathers, cut individually and glued in place one-by-one.  As you can imagine, this took most of the afternoon, but hey, no pain no gain!


To create the layered effect, I started at the bottom of the cloak and glued in place successive rows of feathers, interspersing row cut feathers with individually cut ones to save sanity.  Feathers were applied with a bead of super glue on the end that would attach to the cloak and applied with the delicate use of a pair of tweezers. Some feathers were bent up or down to give a nice flow to the cloak.


And we're almost done!  Now all I have to do is attach the cloak to the model and add some finishing touches.


Here it is, two clasps married the cloak to the model and a thin brocade lined the top of the cloak to cover the tips of those feathers at the neck.


The final addition was made to the helmet, a bit of green stuffing to create a nose guard.  The nose guard added bulk to the head and emphasize an avian "beaky" appearance.


Next up I had three Grular Lifetakers on my desk in need of some customization.  These are cool models with a lot of potential, they're posed as if stalking their prey with bow down at the ready.


To my mind, the only thing they're missing is a knocked arrow.  Let's take a look at how to make one in three easy steps!


Start off creating your arrows by cutting lengths of any suitably sized rod material to be their shafts.  I looked at paper clips before deciding on fine brass pinning rods (the paper clips were a hair too thick).  To reference the length needed for each shaft I flipped a Lifetaker model over and held the pinning rod up next to her arrow quiver.  


Next we need to add fletching to our arrows.  To do this I revisited the same super-thin gauge plasticard I used to create the feathers for the questing knight's cloak.  As seen above the thickness is comparable to a piece of printer paper.


I cut a thin line from the plasticard with tapered ends to create a super long parallelogram.  Yes, I haven't said the word parallelogram since elementary school, it's bringing back some fond childhood memories.


From that long strip I cut the individual sets of fletching that would sit on the proximal (closest to the model) end of the arrow shaft.


The final piece needed to complete the arrow is the arrowhead.  To make an arrowhead I took medium gauge plasticard (seen above) and cut out a small triangle.


Once the arrowhead was glued to the arrow shaft I then trimmed it to get a more refined shape.  This is a lot easier than trying to cut such a tiny piece in your hands.


The end result!  Two of the Lifetakers have arrows knocked and the third is still in the waiting.  A final addition of a hair-string to the bow after painting will finish the model!


Now, time for the promised sneak peek at the new DGS Freeblades miniatures!  These are two models I'm especially excited for, not only because they are excellently sculpted, but because I will be the first to put paint to model on them!

Ok, here they are..


Yes, yes I know, they're not the whole model, but that will come later closer to their release!


Join me next time to check out what's on my desk and what new creations I'm working on at the Monster Lab!