Wednesday, January 30, 2013

KantCon 2013 Announced!

Photo-full

I'm proud to announce KantCon 2013 and the launch of the KantCon 2013 kickstarter!  KantCon (because it's the con you can make when you can't make any other cons) is a game/hobby/fantasy/sci-fi convention started up by a group of local hobbyists in the KC metro area.  I'm a huge fan of local hobby (in Kansas you usually have to drive 6-8 hours to attend any notable event) and am really excited to go to KantCon this year.  Situated the first weekend of July, the Con leaves plenty of time to recoup after Adepticon, still have time to attend GW's Gamesday, and then gear up for Gen Con!

As for the Con itself, the ad above says it all.  This year the convention is moving into a larger venue across town at the Crown Plaza Hotel in Overland Park, KS in order to facilitate the fantastic growth they've had the last couple of years.  Hence the kickstarter.  Their up-front venue costs have doubled and they need our help.  Even if you're not going to be in the area the cause is a great one, and for those donating, the more you give the more perks/loot you'll receive.  This year the KantCon guys are planning some really awesome stuff, ranging from: grab bags, to guest appearances, gaming areas, vendor booths, and an actual tardis!  In keeping with the tradition they set last year, they're also creating an original convention fig.  The theme for their mini is another member of KantCon questing party.  Last year's model was the fearsome Gabbergluck, and this year's is going to be..


Unfortunately, I can't actually can't tell you that just yet.. the big reveal will have to wait until closer to the convention date.  I am, however, proud to say that I was lucky enough to land the job of sculpting this year's mini!  Some keen readers may have noticed me referencing this job (as it has been on my desk since late last year) in previous sculpting project posts.  I'm really excited to share the WIP's when the time comes and break down how the whole project went.  This is the first sculpting that had me dipping into another class of model and took me outside of my comfort zone.


Stop by the KantCon kickstarter, drop them a couple of bucks, and come out for a great time this July!

Wednesday, January 23, 2013

What's On My Desk: Charmed Journal by Sweet Olive Books

This week I'm doing something a little unorthodox here at the Monster Lab and stepping outside the bounds of the typical commissions I get.  Instead of putting paint on a model, this time I'm paining a journal.  For me, this is a really exciting prospect, being able to apply hobby skills to a non-hobby medium.  And for a 15-minute project, I think it looks great. 

Let's take a look.


For those of you who are fans of the Charmed television series, you'll probably recognize the book above right away.  For the rest of us, it's the Book of Shadows from the show, one that is supposed to be filled with magical incantations, spells, and other wisdom.  

I can't take credit for all the work on this project, however, as the journal itself was made by Jessie Alexander proprietor of Sweet Olive Books, a start-up she created a little under a year ago after chancing upon the craft.  Since then, Jessie has been honing her skills and mastering different binding techniques.  The one she used on the book of shadows is an example of the Coptic stitch technique.  Her choice in binding for the BoS was great one, it looks both appropriately simple and elegant.  I think Jessie's work really speaks for itself, and is a testament to the passion she has for what she does.  


For my part on the project, I did the symbol on the cover (called a triquetra) in a 5:1 mix of GW's Blazing Orange (now Troll Slayer Orange) and Mournfang Brown.  To make the center circle and triquetra arcs I used two different sized cylinders to act as guides as I made a pencil outline before applying paint.


When it was complete, the book of shadows was given as a gift to my girlfriend's little sister, who is a huge fan of the show, and she loved it!


If you're looking for a custom made journal, be sure to contact Jessie over at Sweet Olive Books and order one today, for $10-20 each they're an absolute steal!

Thanks for checking out what's on my desk this week, come back next time to see what projects are being brought to life at the Monster Lab.

Happy hobbying and good gaming!


Monday, January 14, 2013

What's on My Desk: Grey Knight Terminators


I'm back to work this week and have a squad of Grey Knight terminators and Lord Driago on my desk.

This is a commission piece at the showcase level of painting (level 2) and I wanted to do some great scenic bases to match.  Ruined cityscape is always a good basing choice for the armies of the 41st millennium and even more so for the Grey Knights.  Whether they are coming in as a MIB style clean-up crew to purge the heretic and alien or be they battling across a ravaged city-hive fighting to the heart of a demonic invasion, city bases look great and give that extra umph to Grey Knight models.

Let's take a look at some of the bases and break-down how they were made.


Each basing was built on a foundation of Apoxie Sculpt, a great modeling apoxie ideal for large projects that need a lot of coverage.  Apoxie Sculpt is also much easier to spread and shape than green stuff and can be easily carved after curing.  I purchased the white apoxie kit, although tons of colors are available from Aves.

I began by mixing a portion of the two part Apoxie and applied it to the center of the base in a clump.  With a broad modeling tool I smoothed it across the remainder of the base and then pressed broken pieces of the cities of death boxed set floor tiles (I don't think they make it anymore..) and rocks into it.  I also bent and then pinned brass rods into the sides of the tile piece to look like broken rebar. The whole thing is finished by brushing on white glue (Elmer's) and then applying Woodland Scenics fine and medium ballast to bring together the rocky debris.


For this piece I cut a section from a Plastruct I-beam and set it into the Apoxie Sculpt.


When I was building the bases I tried to keep the figures I had built in mind, but for the most part, I made bases that I thought would look cool and then matched the Grey Knight who would look best on a base to that one.  There's just something that's super cool about this guy, he looks like a G.K. ninja about to lay the smack down!


Plastruct cylindrical tubing makes ideal pipes.  The base at the rear of this group has an assortment of small, medium and large tubes jutting out from the ruined tile above it.  The tile also has fractured pieces hanging off its side, supported by the rebar between them.


Another of my favorites, this G.K. has a strong sense of forward motion. I wanted to place him on a base that paired well with his posing and ended up on this one.  He's coming down from a higher vantage point on the base looking almost like he's jumping, but definitely about to bring the Emperor's justice to some heretic/alien scum/demonic menace.


I don't get to do space marines often, and I have to say, the work so far on this commission has been refreshing.  I'm looking forward to getting some paint on these guys and think I might try my hand at a non-metallic metal scheme instead of the classic blue-silver.  I really want these guys to shine on the table top and have been pretty happy with the pale armor I've done on a past commission.

Thanks for stopping by and checking out what's on my desk!  Come back next week to see what other projects I'm working on here at the Monster Lab!

Monday, January 7, 2013

Showcase: The Skethar King

Last week I debuted my first 100% original model sculpt, the Skethar King.  The completion of the S.K. was definitely a milestone in my modeling career, one that started 10 years ago and has steadily progressed from simple weapon swap conversions to large scale sculpting additions.  In a few short years after that I was making models from scratch and adding a few manufacturer's components to finish.  It has truly been a labor of love and an absolute delight to take an idea in the mind and bring it to life on the table top.  That's why I created the Monster Lab a year and a half ago and gave it its namesake, so I could share my work with you and the rest of the world.  That goal has never changed, and as I've shifted from one career track to another, hobby has always remained a mainstay in my life.  It's really a dream come true to now be doing it for a living, and I'm excited to see where it will go in the future, studio painter? studio sculptor?  I can't wait to see.

I'd like to thank you for reading and sharing a piece of that journey with me and I hope that maybe, in some small part, I've touched you and inspired you in your hobby aspirations.  There's so many in my local hobby community and the blogosphere that have inspired me.

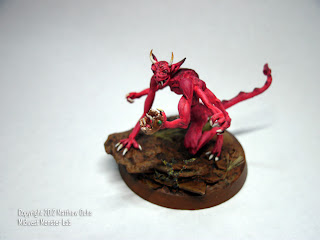
As for the S.K., here he is,  painted and complete.


Face in focus

Crown in focus


Last week I discussed the decisions I made in modeling the S.K.'s pose, so this time I'd like to talk about the colors used to paint him.

Drawing my inspiration from the original DGS Freeblades Skethar sculpt, I felt there was a strong classic "devil" theme there (red skin, horns, spaded tail, pernicious and mischievousness attitude), so my first decision to give the model red skin was an easy one.  I wanted to take that idea to the next level and add another level of depth to what could easily be an overly simplistic paint scheme.  I'm a big fantasy art enthusiast and a casual Magic: the Gathering player and I love checking out the new art featured on M:TG cards with each new release.  When considering what I wanted to do with the S.K.'s base scheme, a card, Rakdos Cackler, immediately popped into mind.  I decided I would paint his spine darkest and freckle down from there onto his arms, face, and chest.  The highest points on the model (spine, spikes, and ears) would be the darkest areas on the model, a reverse highlight if you will.

Everything else would be shaded in contrast hues to add strong focal points on the model, like his fingernails, horns, eyes, and teeth, drawing attention to his hand gestures and facial expression.  The base he's standing on is painted in the rugged earth tones of the scrubland deserts native to the Grular tribes, those who summon the Skethar demons in battle.


As I mentioned last time, this model was a special gift made for my long-time customer Jon C. over at DGS games.  He commissioned me to paint a group of six Skethar, two "alphas" with six arms and four regular little 'uns.  He asked me to convert two separate alphas, each from two existing Skethar models since DGS doesn't currently have a sculpt for the model.  I knew I wanted to do something special for Jon, and decided it would be be really fun to do the first original rendition of the Skethar alpha.  All the little Skethar out now are females, so I thought to sculpt a male "king," complete with a crown stolen from a human counterpart!

I'd like to present the Skethar horde.


Here's the S.K. surrounded by all his ladies, along with the female alpha in back.


Here's the alpha I made as a conversion from two existing Skethar models.  To distinguish her from her lessers, I wanted to highlight her exceptional strength and magical mastery by adding glowing eyes and runes across her body (the little 'uns have beady black eyes and mundane coloring).


Each of the little Skethar received a different form of color blending, this one is red from front fading into orange on her back.


The first Skethar I painted out of the batch, I did a "mittens and boots" approach, fading brown into orange. I got the idea when I asked my girlfriend, Harley, for color suggestions, "paint her orange!" she said, suggesting her favorite color.


Since I had already done a traditional red-devil scheme on the first Skethar I painted for Jon, and I was again doing a similar color scheme on the S.K. I wanted to dig into a whole other palette of color options, like purple, black, and magenta.  These two Skethar are both from that selection, blending colors from the top of the model to bottom.


Here's the whole group together!  If you line them up from orange, to red, to magenta, to purple, to alpha, there is a visible transition across the color palette and the squad.


That's it for this week, thank you for stopping by and checking out the latest project I've been working on here at the Monster Lab!


As always, happy hobbying and good gaming!


Related Posts Plugin for WordPress, Blogger...